Deep Dive Recap: Bolster your Custom Forms with Advanced Components

Custom Forms play a pivotal role within the Lawmatics platform, but are you making the most of their capabilities? While you might have a grasp of the fundamentals, there's a world of advanced features waiting to be explored. Let's harness the full potential of Custom Forms by ensuring you collect precisely the information you need, and nothing more.
Our journey into these advanced elements covers a range of powerful tools, including conditional logic, repeatable relationship blocks, and file uploads. Some of these components may still be hidden gems in your toolkit. In this exploration, we'll dive into the strategies of seasoned Lawmatics users who maximize the benefits of form creation at every turn.
Form settings
When you create a new form in Lawmatics, you'll notice the option menu in the upper left corner. You can access this menu by hovering over the "Assets" tab at the top of the screen and selecting "Custom Forms."
Form name and form type
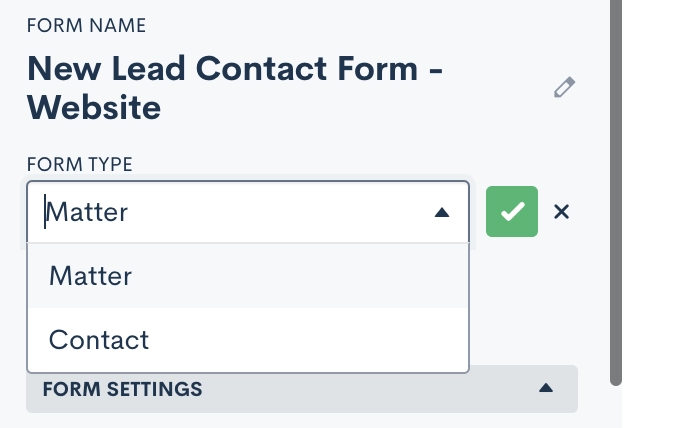
Start by giving your form a name. This name can be for internal use or client-facing, as we'll discuss further shortly. Next, select one of two form types:
- A "matter type" form will create a matter when submitted.
- A "contact type" form will create a contact when submitted.
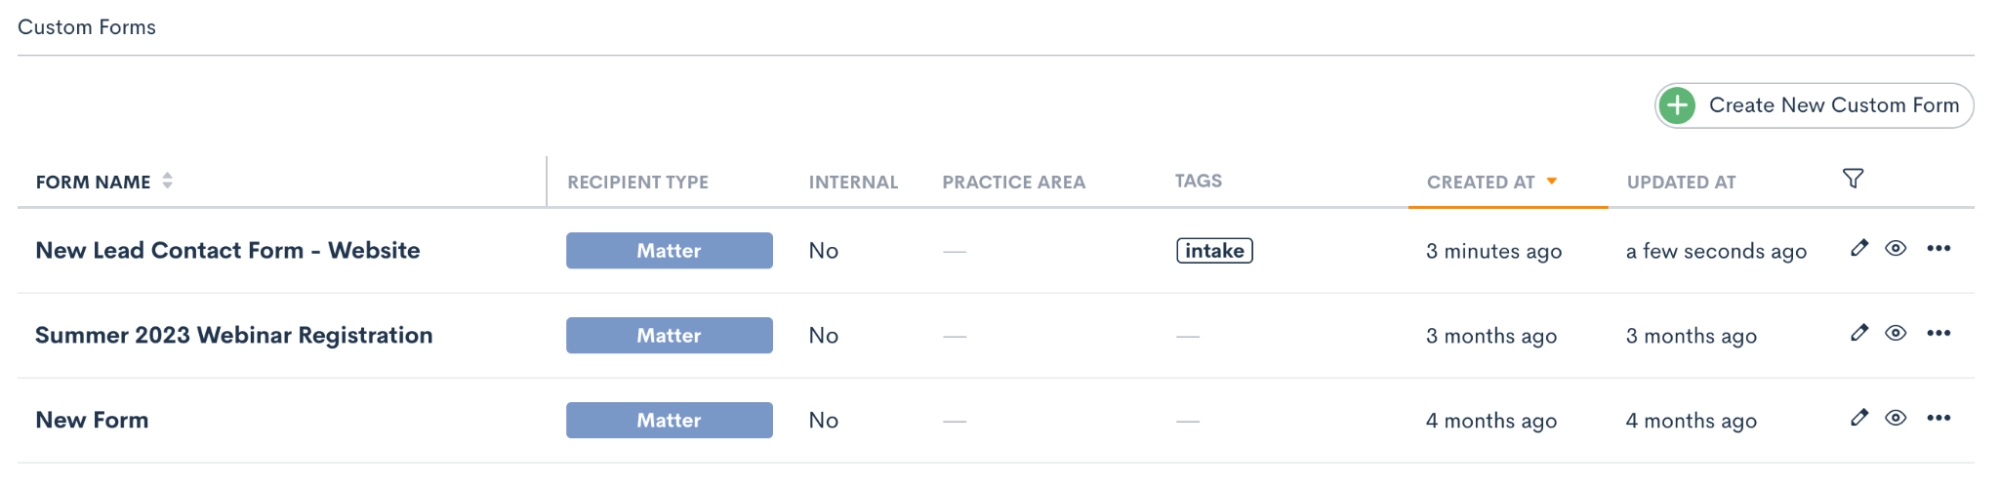
Form tags
If you so choose, you can also assign a Tag to your form. This can be particularly helpful for organizing and locating forms, especially if you have numerous forms. For example, you might label all your intake forms as "Intake" or categorize forms related to specific practice areas accordingly.
When viewing all your forms on the Custom Forms page, you can easily filter and sort them by tag.
Form share title & redirect URL
Once you've set the Form Name, Type, and tags, you can move on to the Form Settings section. Here, you have some additional options:
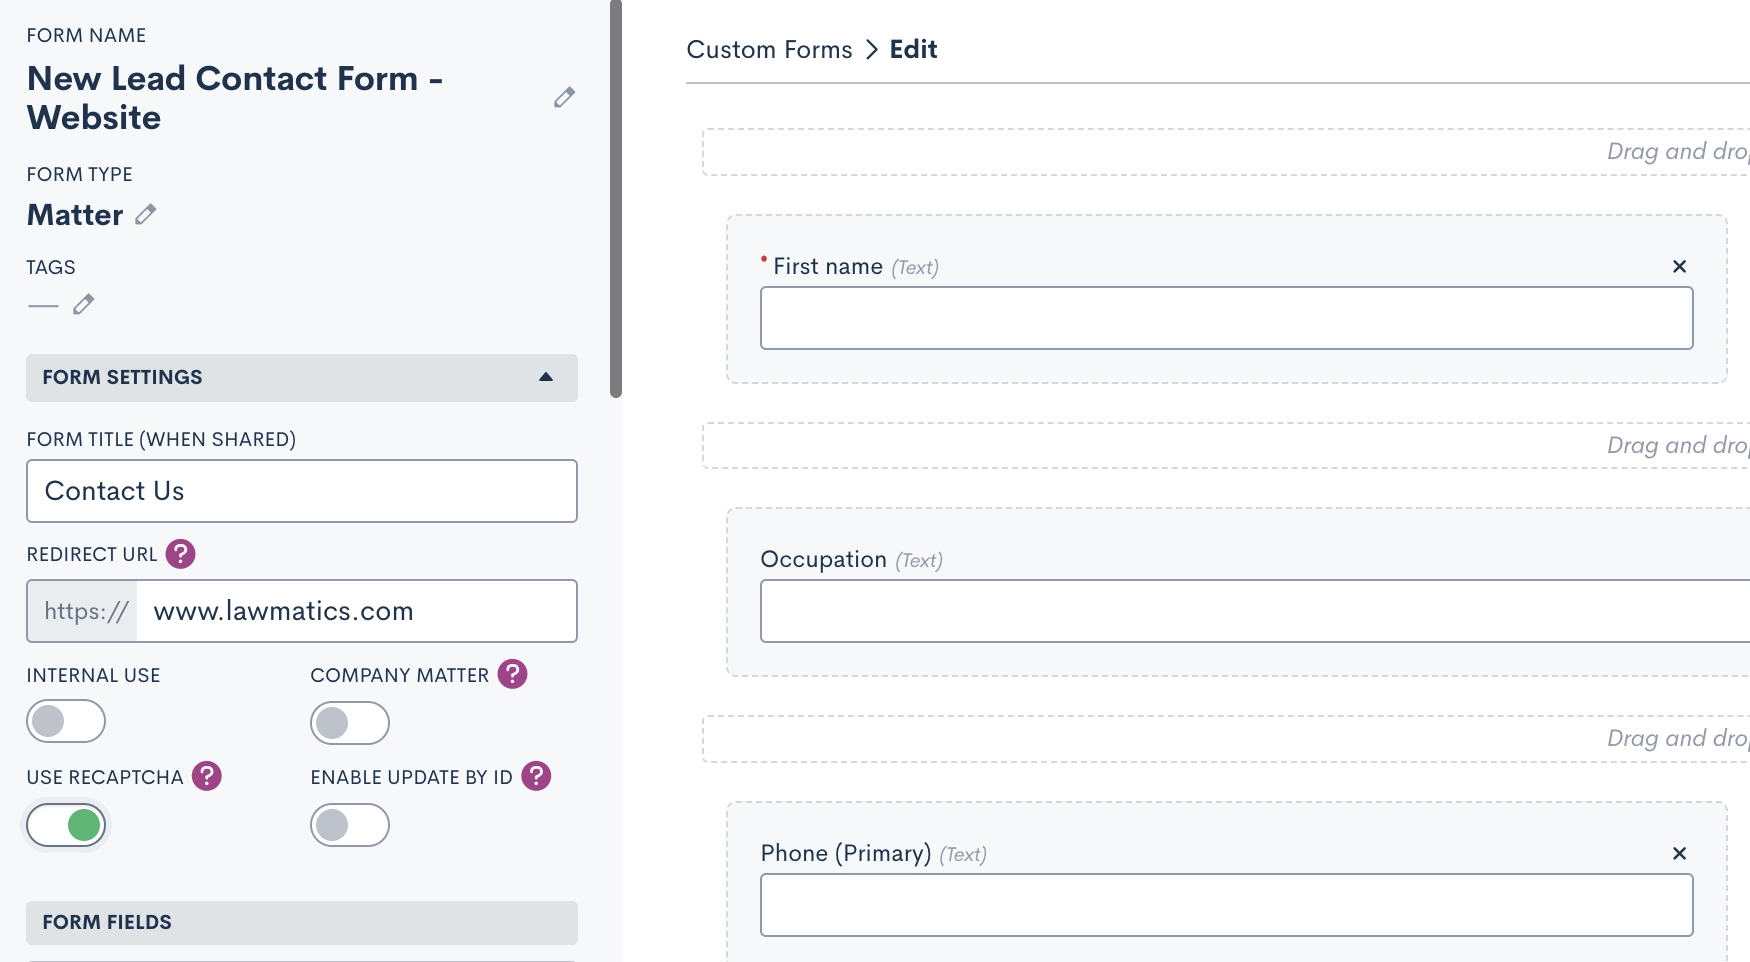
- You can give your form a Share Title that's different from the Form Name. This is useful when you want an internal name but something more client-friendly to appear as the form title.
- The Redirect URL is a valuable feature that allows you to redirect the person filling out the form to a different webpage after they submit it. For instance, you might want to direct them to an FAQ page on your website or a relevant article.
reCAPTCHA & additional settings
In the Form Settings section, you'll find several toggles for additional settings:
- You can make the form internal, which means it can only be accessed by a Lawmatics user signed in to the platform. Internal forms grant access to certain internal-only fields. This option is suitable for forms intended for internal staff, such as a phone intake form.
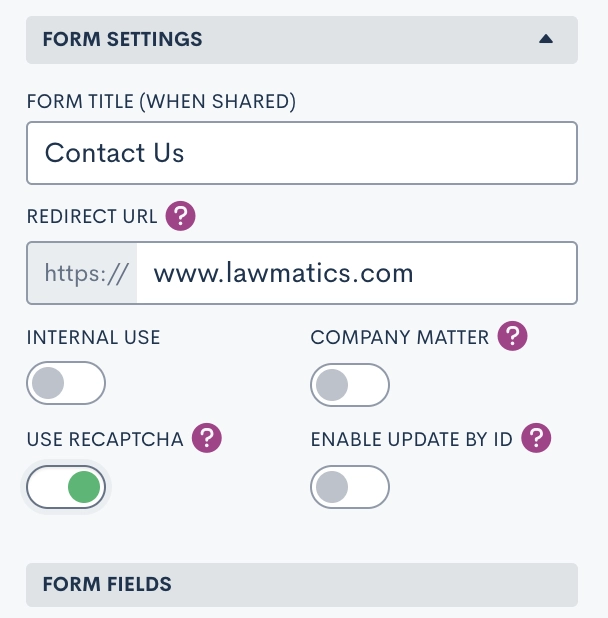
- Enabling reCAPTCHA helps prevent spam entries for forms embedded on your site or elsewhere. When enabled, you'll see the reCAPTCHA logo on your embedded forms.

- The Company Matter toggle, when enabled, will create each submission as a company matter by default. Ensure that the Company Name field is present on the form when selecting this option.
- You'll also find the option to enable Update by ID, a feature that's less commonly used but can be handy if you need matters to access their form from a static link, perhaps on your website or another source outside of Lawmatics. When this setting is enabled, a unique ID is required before accessing and filling out the form.
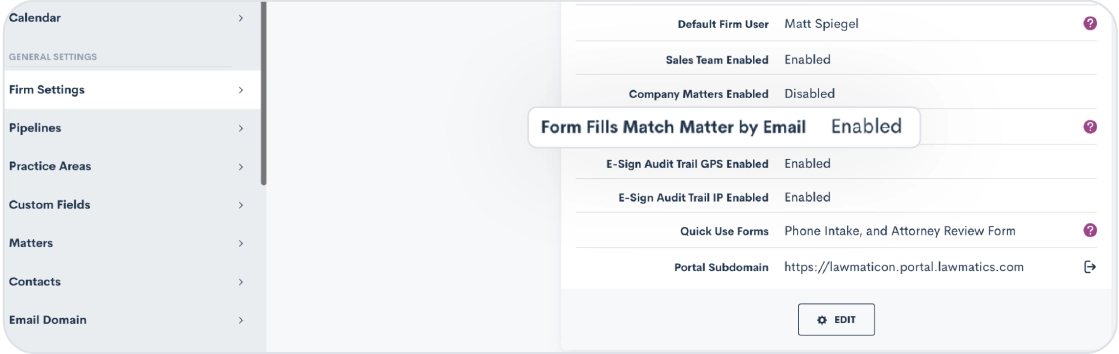
- Lastly, navigate to your Main Settings page (accessible via the gear icon near the top right) and select Firm Settings to make one additional selection. It's typically a good practice to enable the setting to Match Form Fills by Email to help prevent duplicates.
Data fields
Adding fields is a fundamental aspect of form creation. Although this isn't categorized as an "advanced component" of forms, it's still essential to grasp the various types of fields you can incorporate into a Custom Form.
Standard & custom fields
Standard fields are pre-built components within your Lawmatics CRM that capture basic information such as name, email, phone, address, and more. You shouldn't create Custom Fields for this standard data. Custom Fields, on the other hand, enable you to track unique data in your CRM.
Creating and adding custom fields to your Custom Forms is a critical step. It allows you to later analyze or merge data collected from forms. When constructing your custom form, explore the Matter Custom Fields section to access existing fields and create new ones for inclusion in the form.
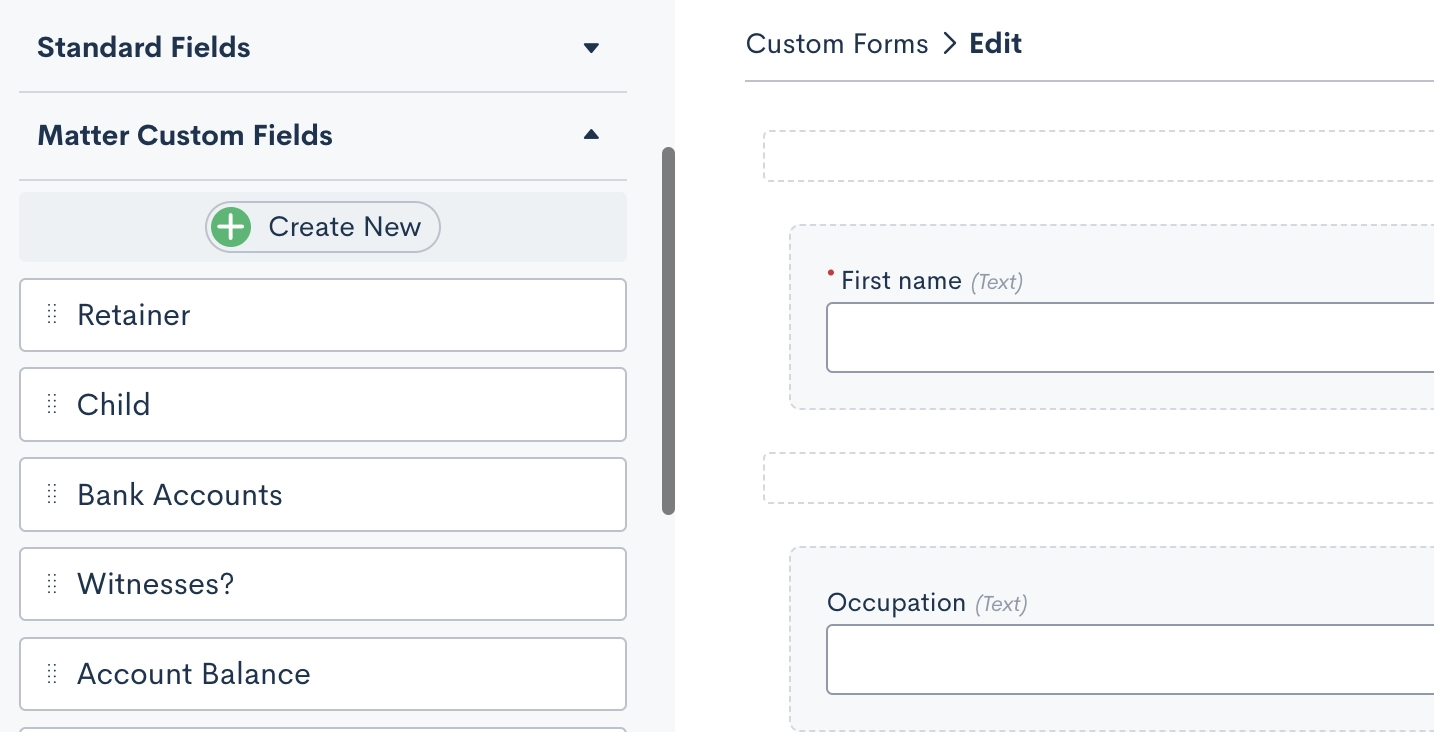
Drag and drop these fields onto the form canvas to add them to your form.
General Fields
General fields are intended only for questions where the answers don’t need to be stored on the CRM record itself. These fields are only used within the constraints of the form itself, and cannot be merged into a document, used in a report, synced to case management, etc.

Drag a general field onto your form, and then click on it to set the label and field type.
These types of fields are typically only used for questions that require no further action on your part; you may only need to reference them within the form itself.
Conditional logic & required fields
Whenever you add a field to your form, whether it's a custom, standard, or general field, clicking on it reveals advanced options. These options encompass making the field required, hidden, and applying conditional logic.
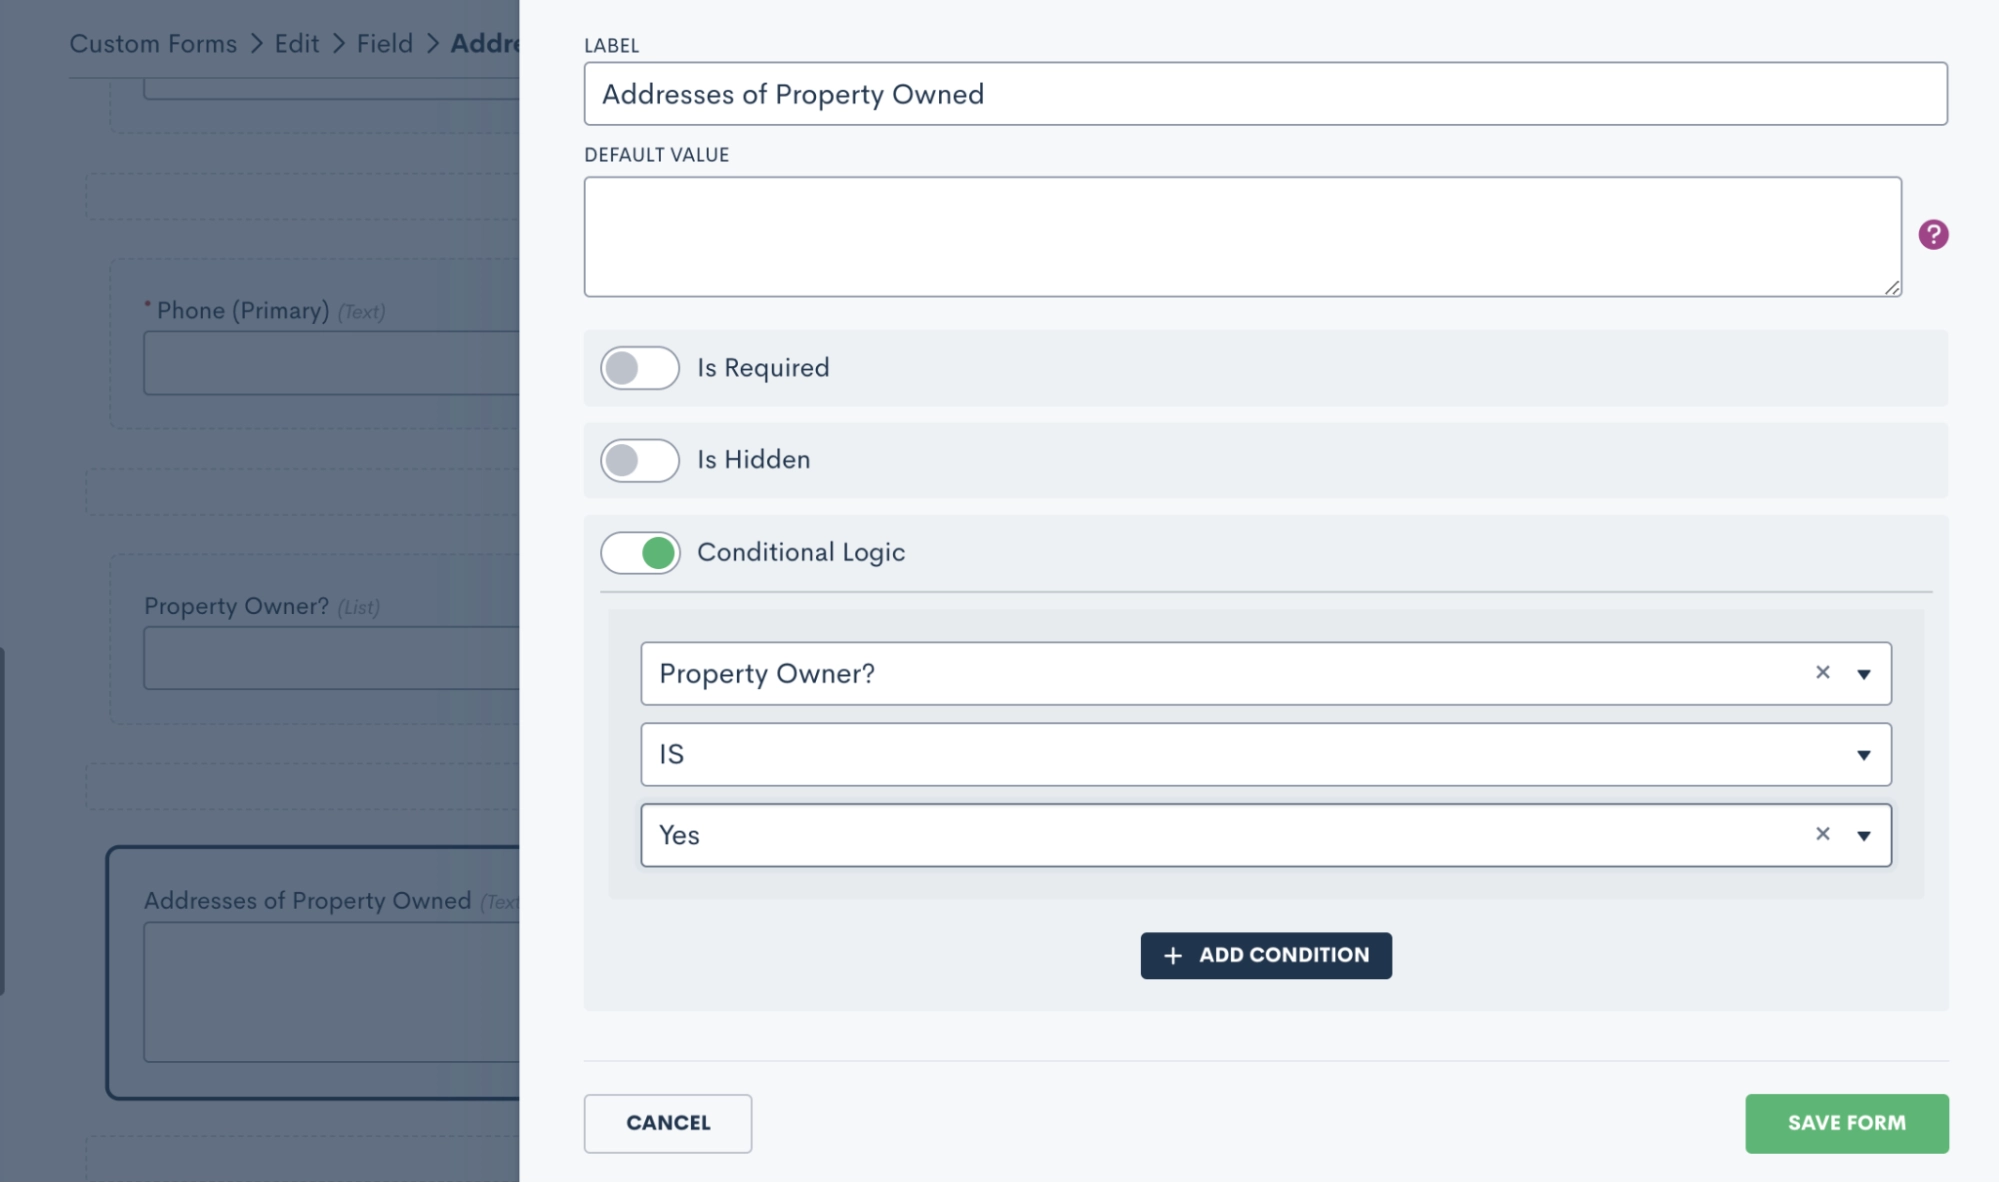
Within your firm's intake forms, certain questions may be relevant based on the response to a previous question. Conditional logic ensures that the appropriate follow-up questions appear in your form only when necessary.
Conditional logic enhances the experience for your leads and clients because they encounter only questions that pertain to them in your intake form. This approach reduces the likelihood of them feeling overwhelmed by a lengthy form with questions that may not apply to their situation.
Blocks
In the custom forms editor you will see options for two types of blocks: Standard Blocks and Relationship Blocks.
- Relationship Blocks are designed for creating separate contacts associated with a matter, such as a spouse, co-client, child, co-defendant, and so forth.
- Standard Blocks do not create contacts like relationship blocks do. Instead, they allow you to group a selection of fields into a single block that can easily be added to any of your forms with a single drag and drop.
Standard Blocks
Blocks are employed to group fields that may repeat across multiple forms. For instance, you might have a set of standard questions about a client's financial assets that's relevant to several of your forms. Rather than manually adding each individual field to every applicable form, you can create the block once and then include it in any form that requires it.
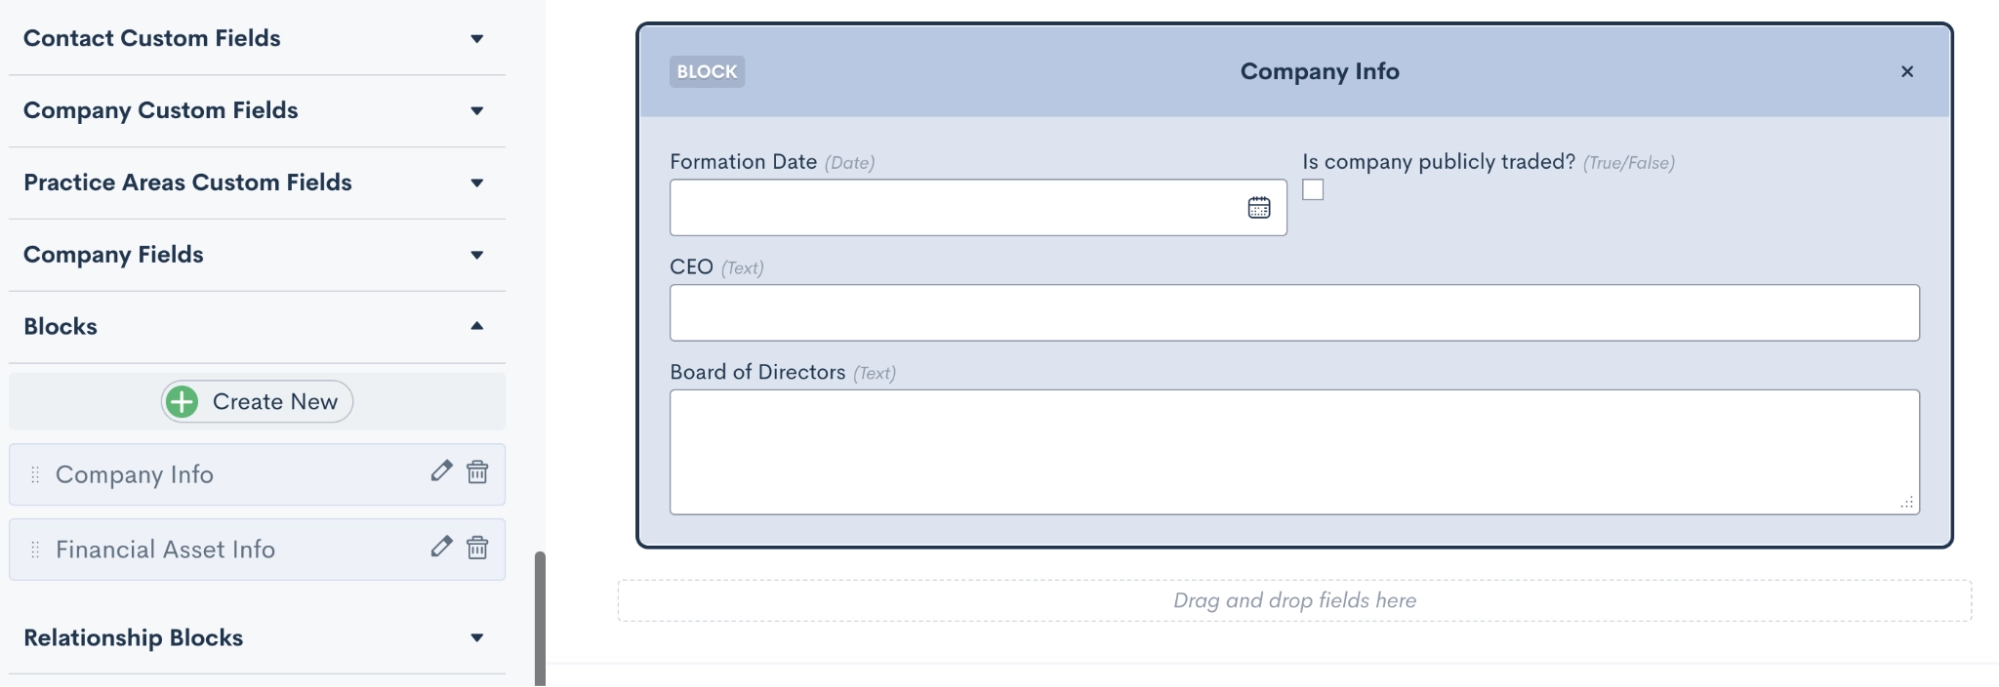
To use blocks start by expanding the Blocks section on the left sidebar of the form editor. Here, you'll find existing blocks and the option to create a new one. Drag and drop a block onto the form canvas to include it in your custom form.
It's important to note that standard blocks do not offer the option to "add another" for collecting multiples of a specific type of data point.
Relationship Blocks
Enter relationship blocks. These blocks are invaluable for gathering information about other contacts connected to a particular matter. While every matter has a primary contact, you can link additional contacts using relationship blocks. Here’s how to use relationship blocks:
- First, you'll need to create your relationship types by going into your Settings (gear icon near the top right corner), and selecting Matter Settings from the left sidebar.
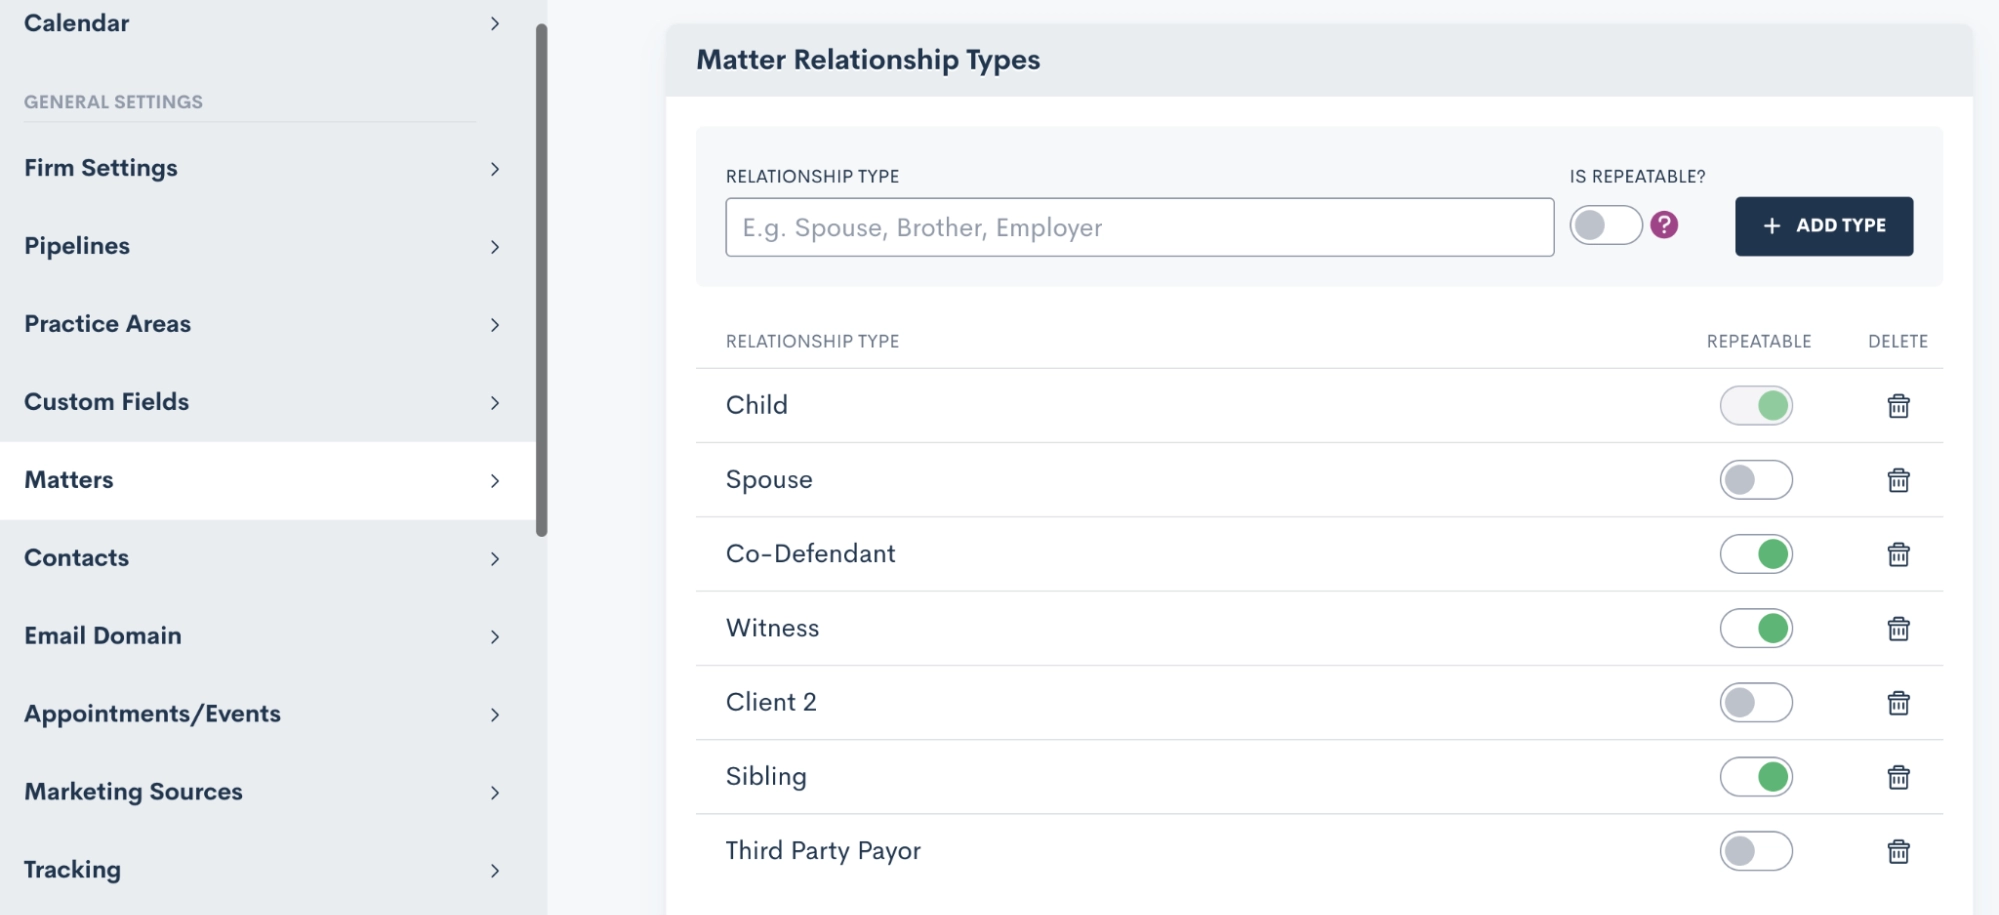
- Within Matter Settings, you can create relationship types by specifying a title, indicating if it's repeatable or not, and then clicking "Add Type."
- With your types in place, you can create relationship blocks for each of these types as needed. The process is similar to creating a standard block. Simply drag and drop it onto your form, and then click on it to access additional options.
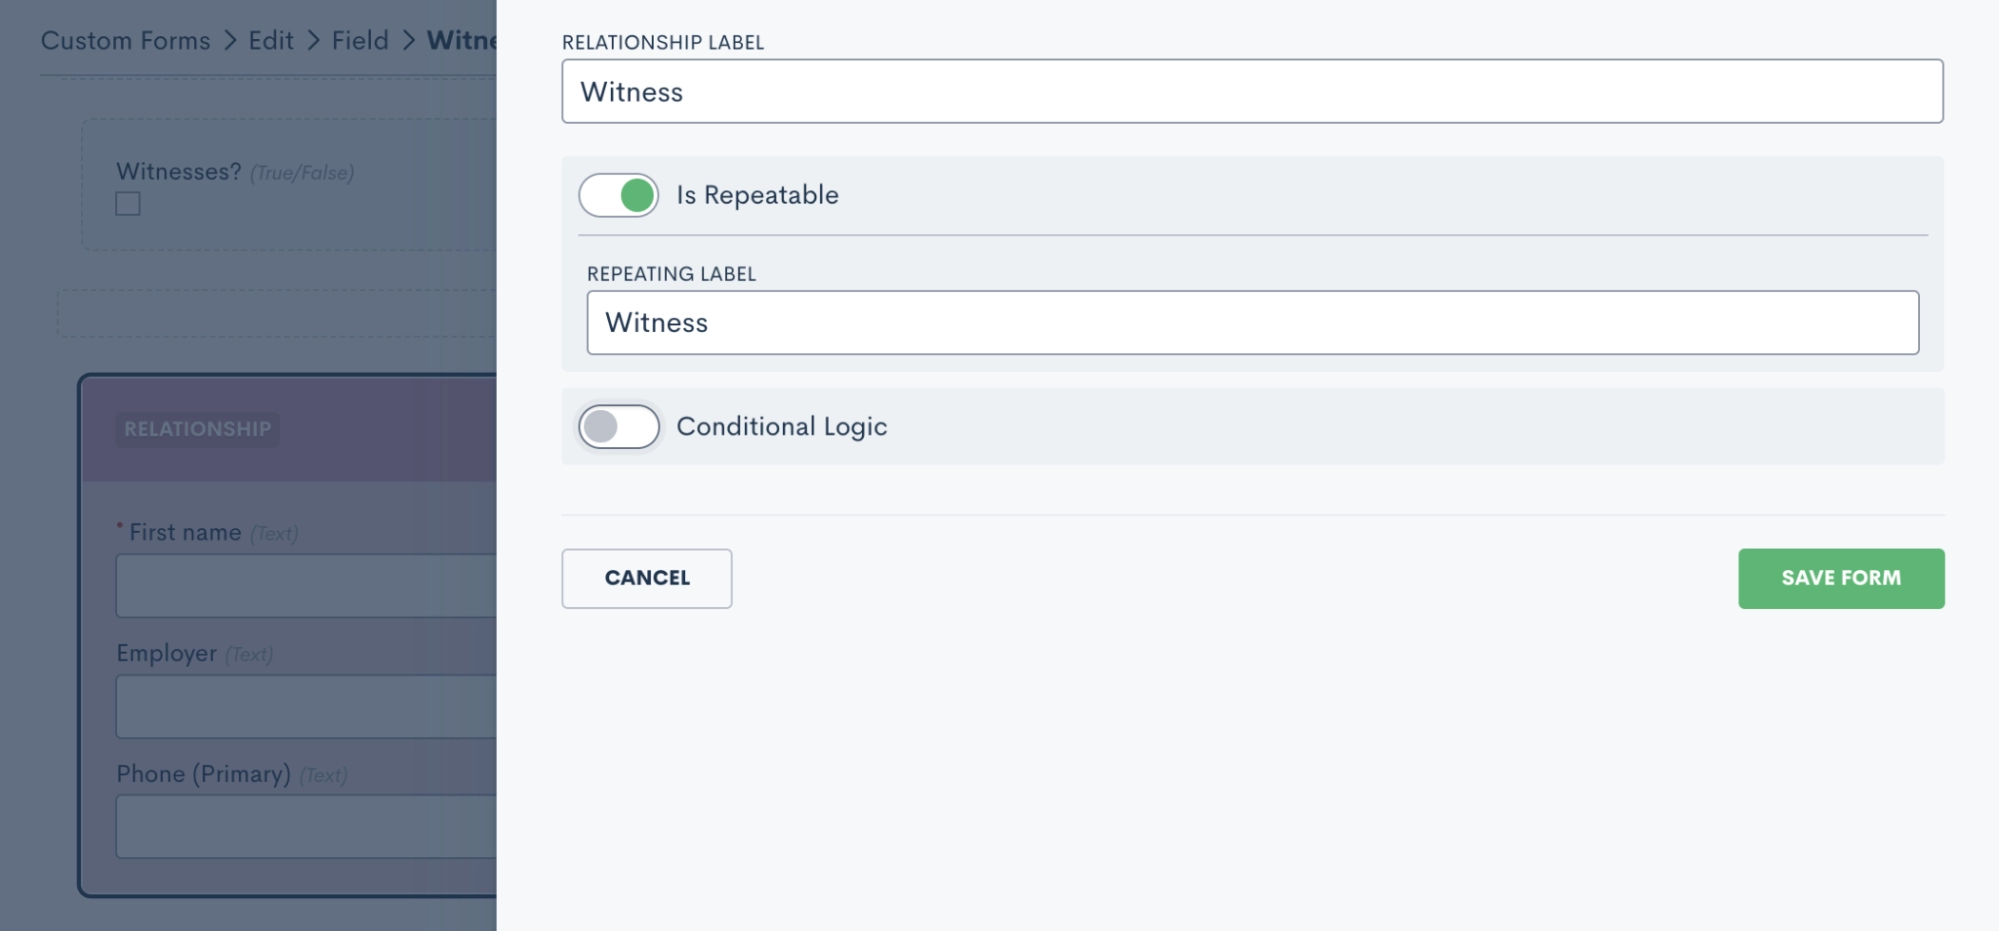
- When you designate a relationship block as "Repeatable," you gain the ability to "Add Another" on the form. This feature is particularly useful for collecting data on children, siblings, and so on.
Advanced options
Working our way down the side panel of your Form Builder, you’ll see a section labeled “Advanced”. You might already be familiar with some of these features, but there are likely a few that you haven't had the chance to explore yet.
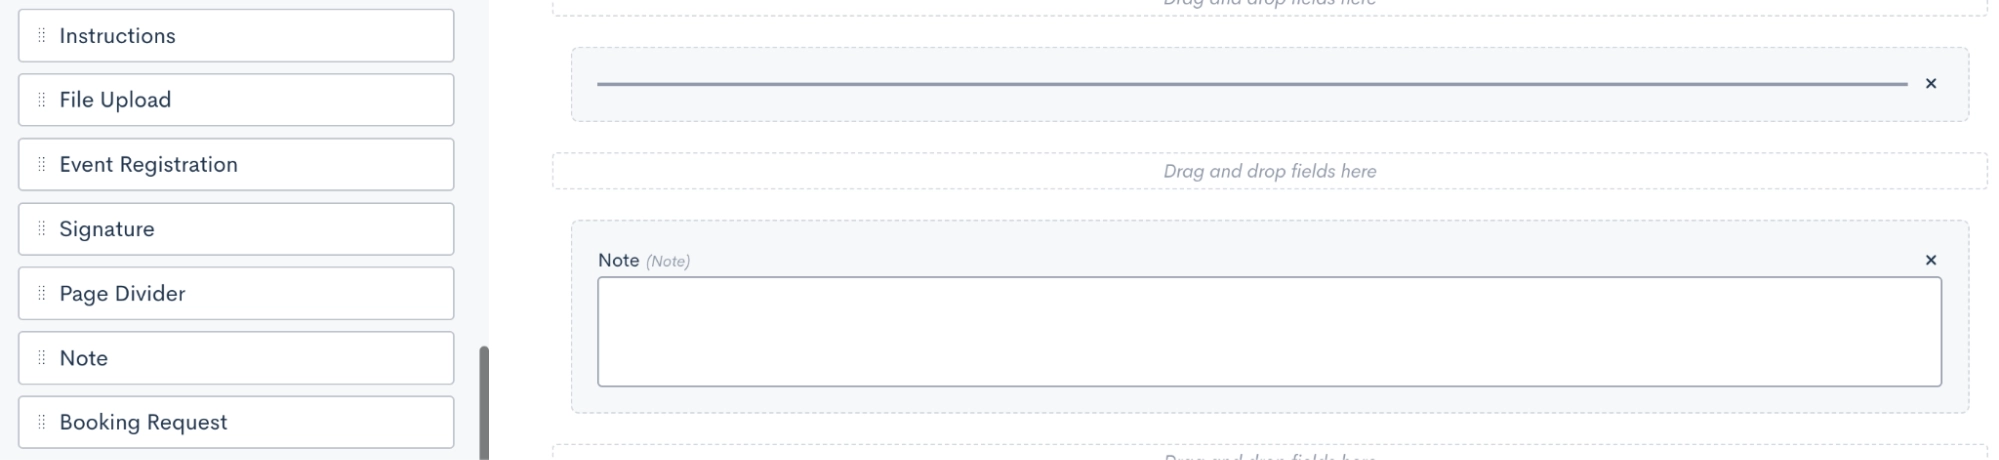
Instructions
You can add a text block by dragging an instructions block into your form. This text can serve as headings, notes, or guidance for the next section of your form.
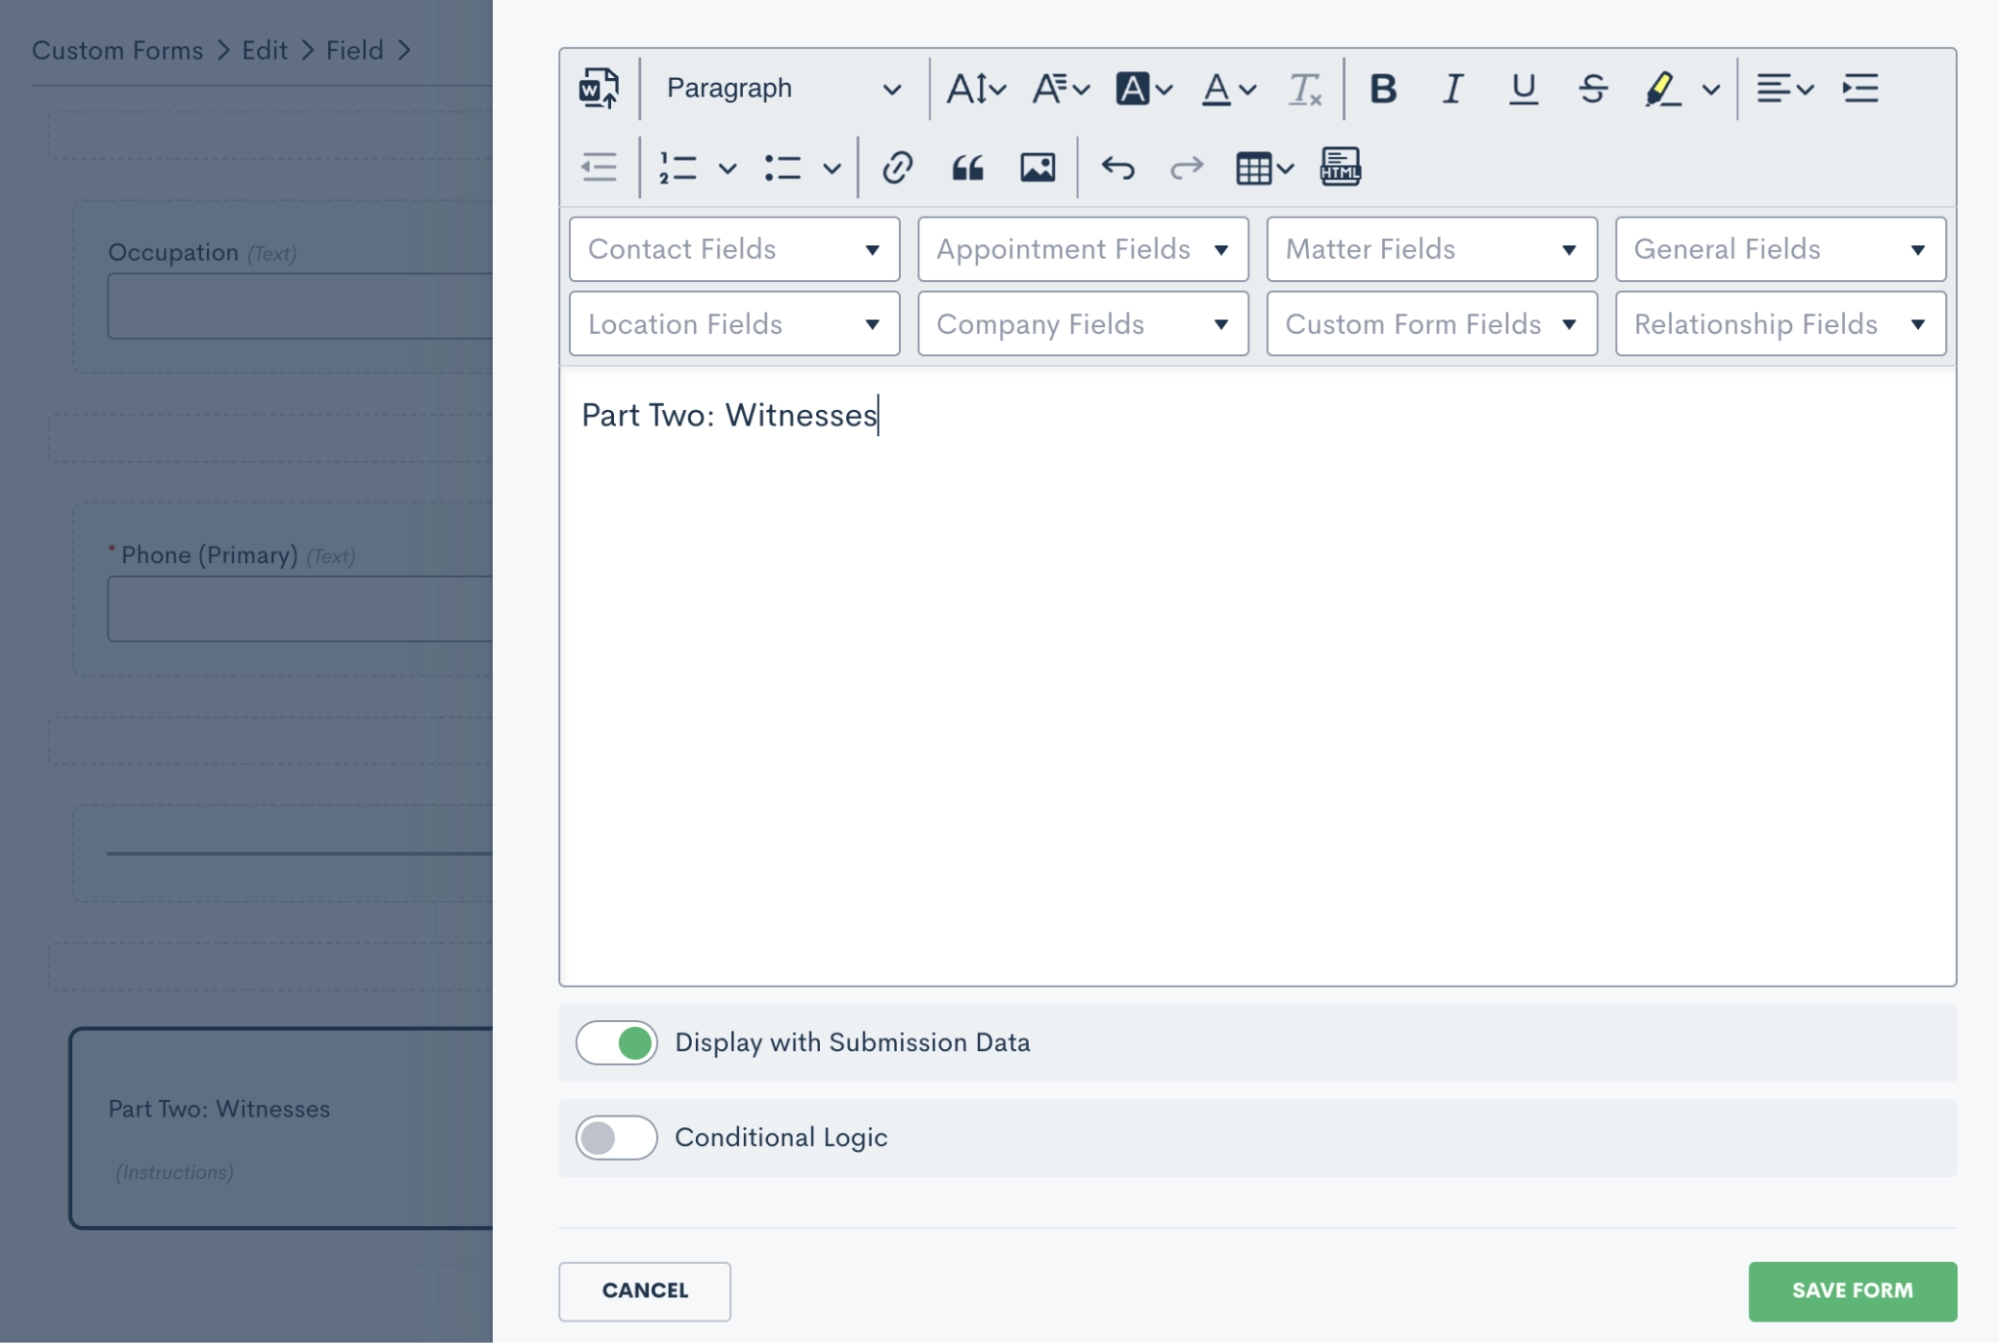
Importantly, Instructions Blocks don't require the person filling out the form to input any information; they simply provide information or direction.
After placing an instructions block, click on it to input your text. You can also merge fields, apply basic formatting, and incorporate conditional logic. Additionally, you have the option to include or exclude the instructions in your form submissions.
File upload
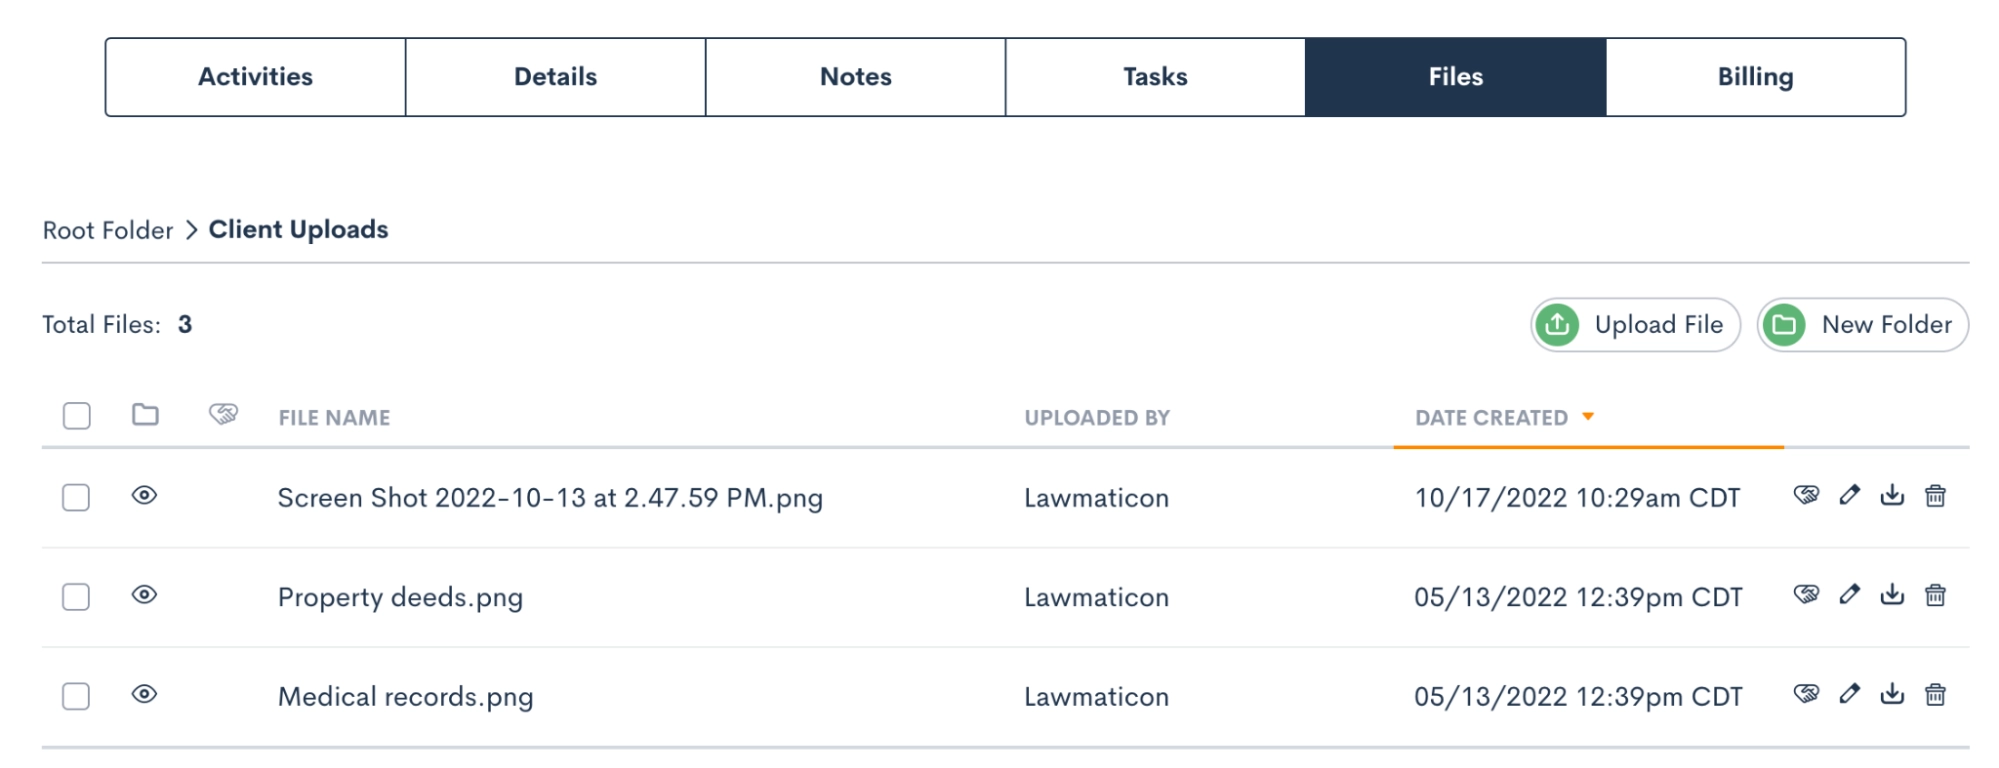
The File Upload object allows individuals completing the form to seamlessly upload files while filling it out. This is a convenient way to gather all necessary information and documents in a single step.
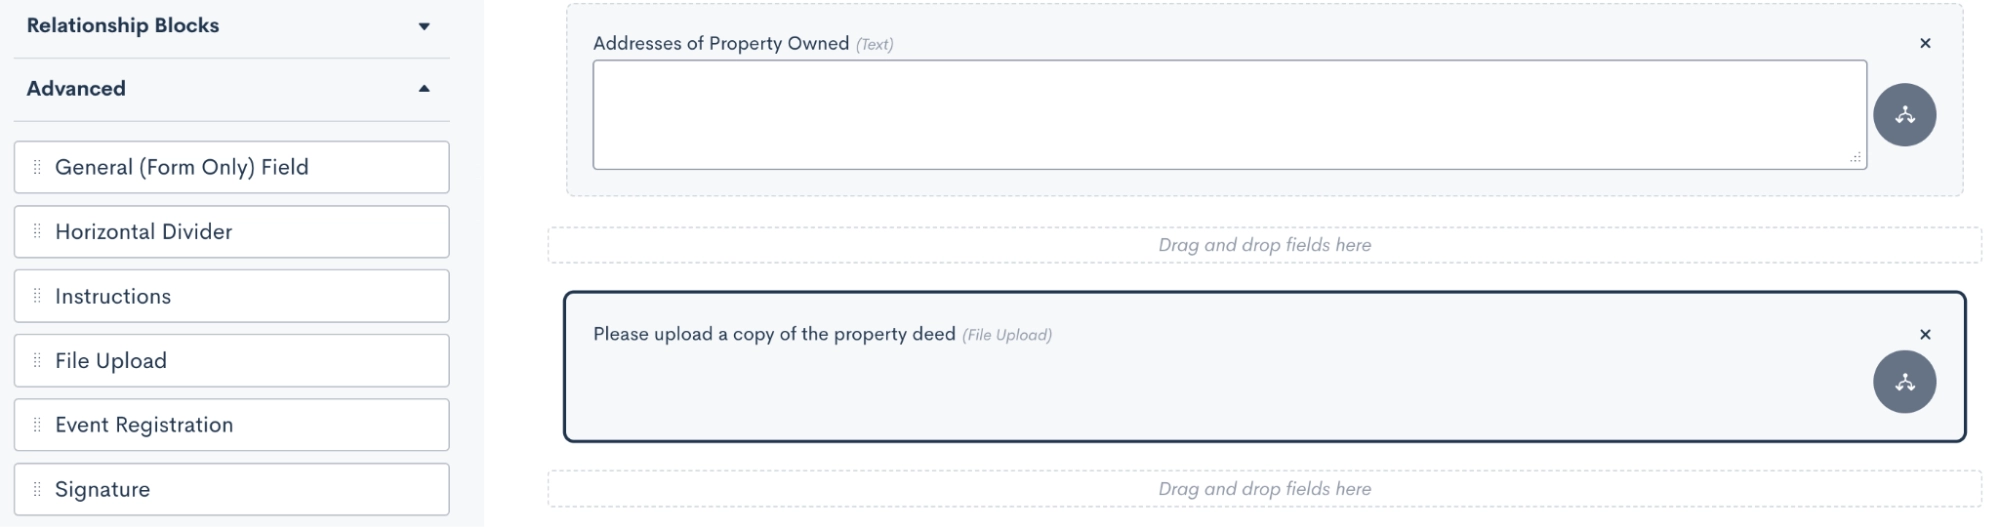
After adding the File Upload object to your form, click on it to access further options. When someone is filling out the form, they can easily drag and drop files or browse their local files to upload. Any uploaded files will be saved directly in the Files tab of their matter profile.
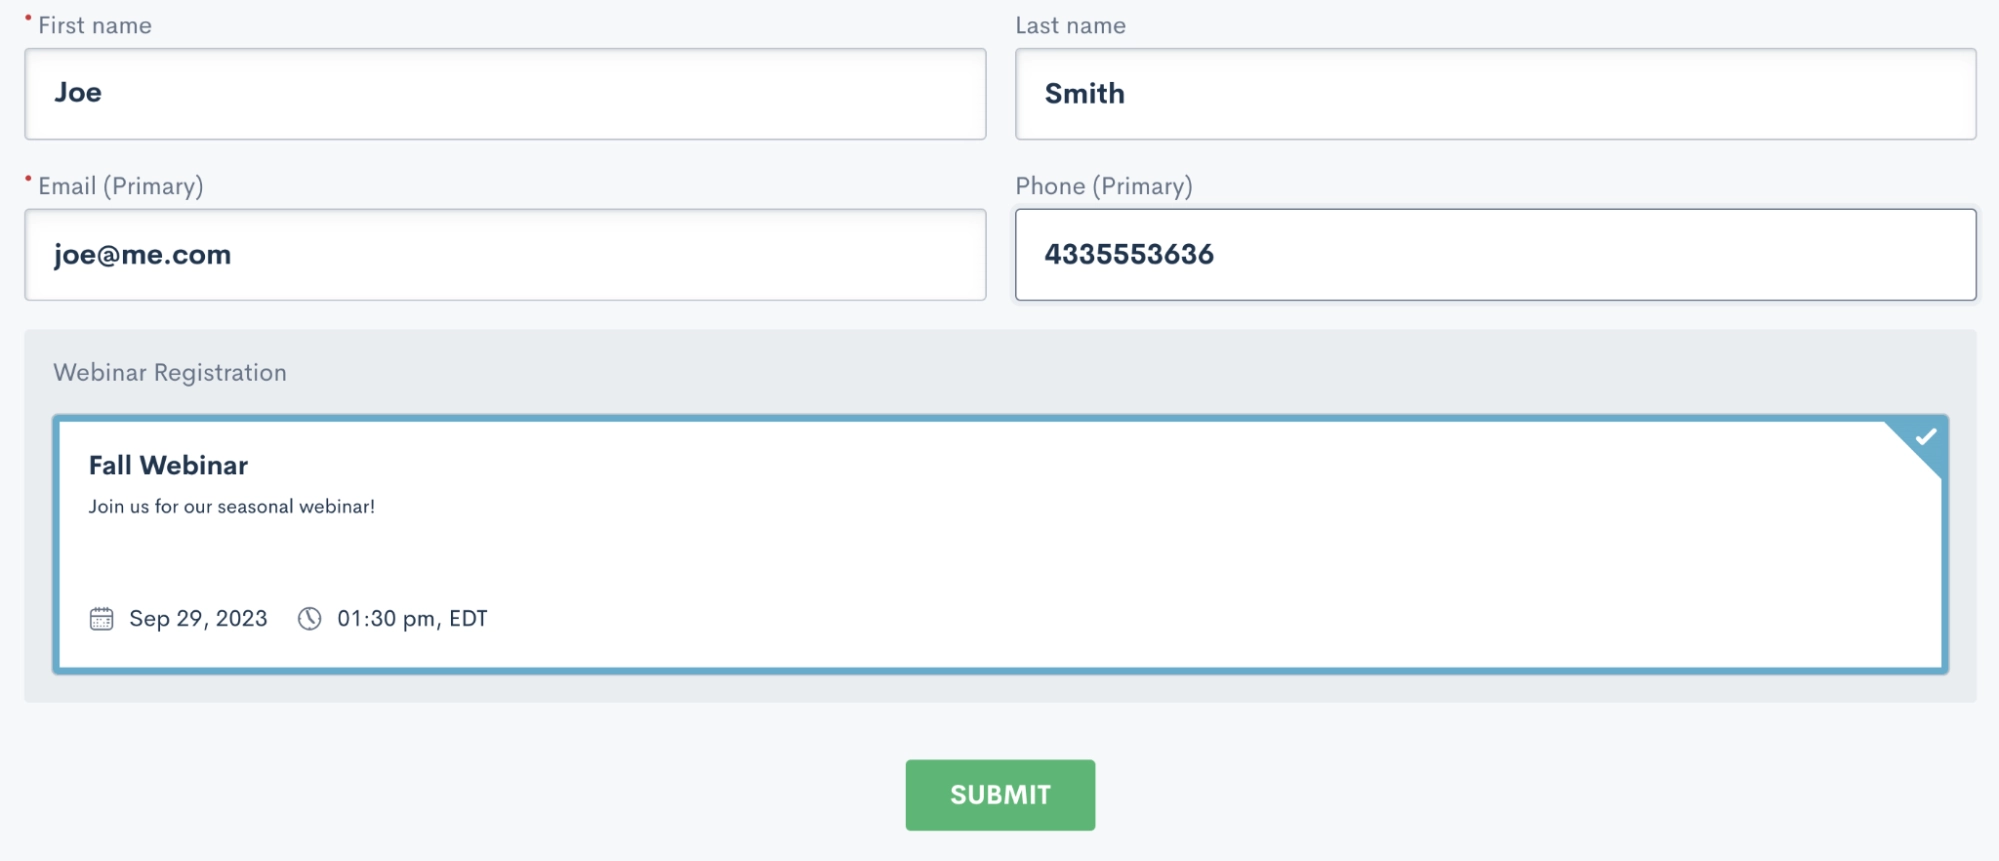
Event registration
**Note: The event management feature is available for our Pro Tier users and above**
Lawmatics provides comprehensive tools to manage major events like webinars, luncheons, networking events, and more. Event management differs from appointments in that it can accommodate anywhere from one to thousands of registrants.
Most commonly, you'll promote events and collect registrants using a Custom Form. Simply drag the Event Registration field from the Advanced section on the left side panel.
Click on the field to make customizations, and people can easily register for the event when filling out the form.
Signature
Use the signature object to collect a hand-drawn signature from the person filing out the form.

It's important to note that this option isn't compliant with e-signature regulations, so it isn't considered a legally binding e-signature.
Learn about our compliant e-signature features here.
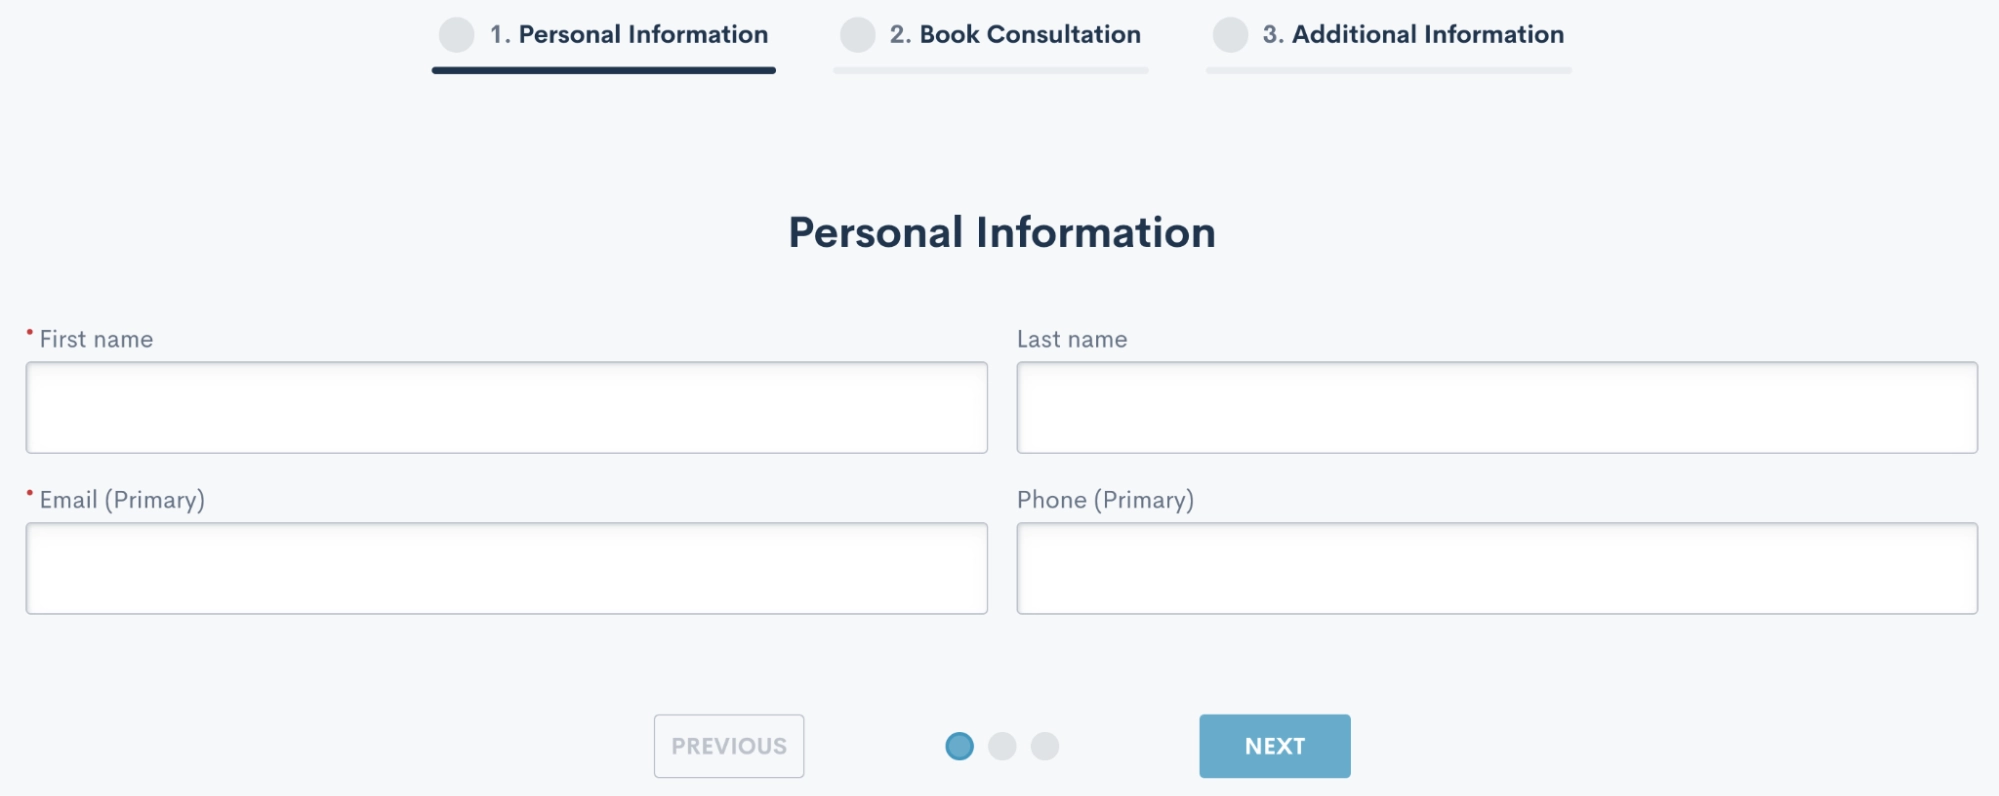
Page dividers
For longer intake forms or questionnaires, you may want to use pagination to improve form organization. Drag a page divider onto the form to add pagination, and then use additional dividers to separate different sections or pages.
This creates a well-organized and user-friendly form, enhancing the overall client experience.
Note
The Note feature saves a note directly to the notes section on the matter's profile.
While it resembles a field in the form, it's distinct from populating a field. You can access these notes in the notes tab of the matter.
Booking request
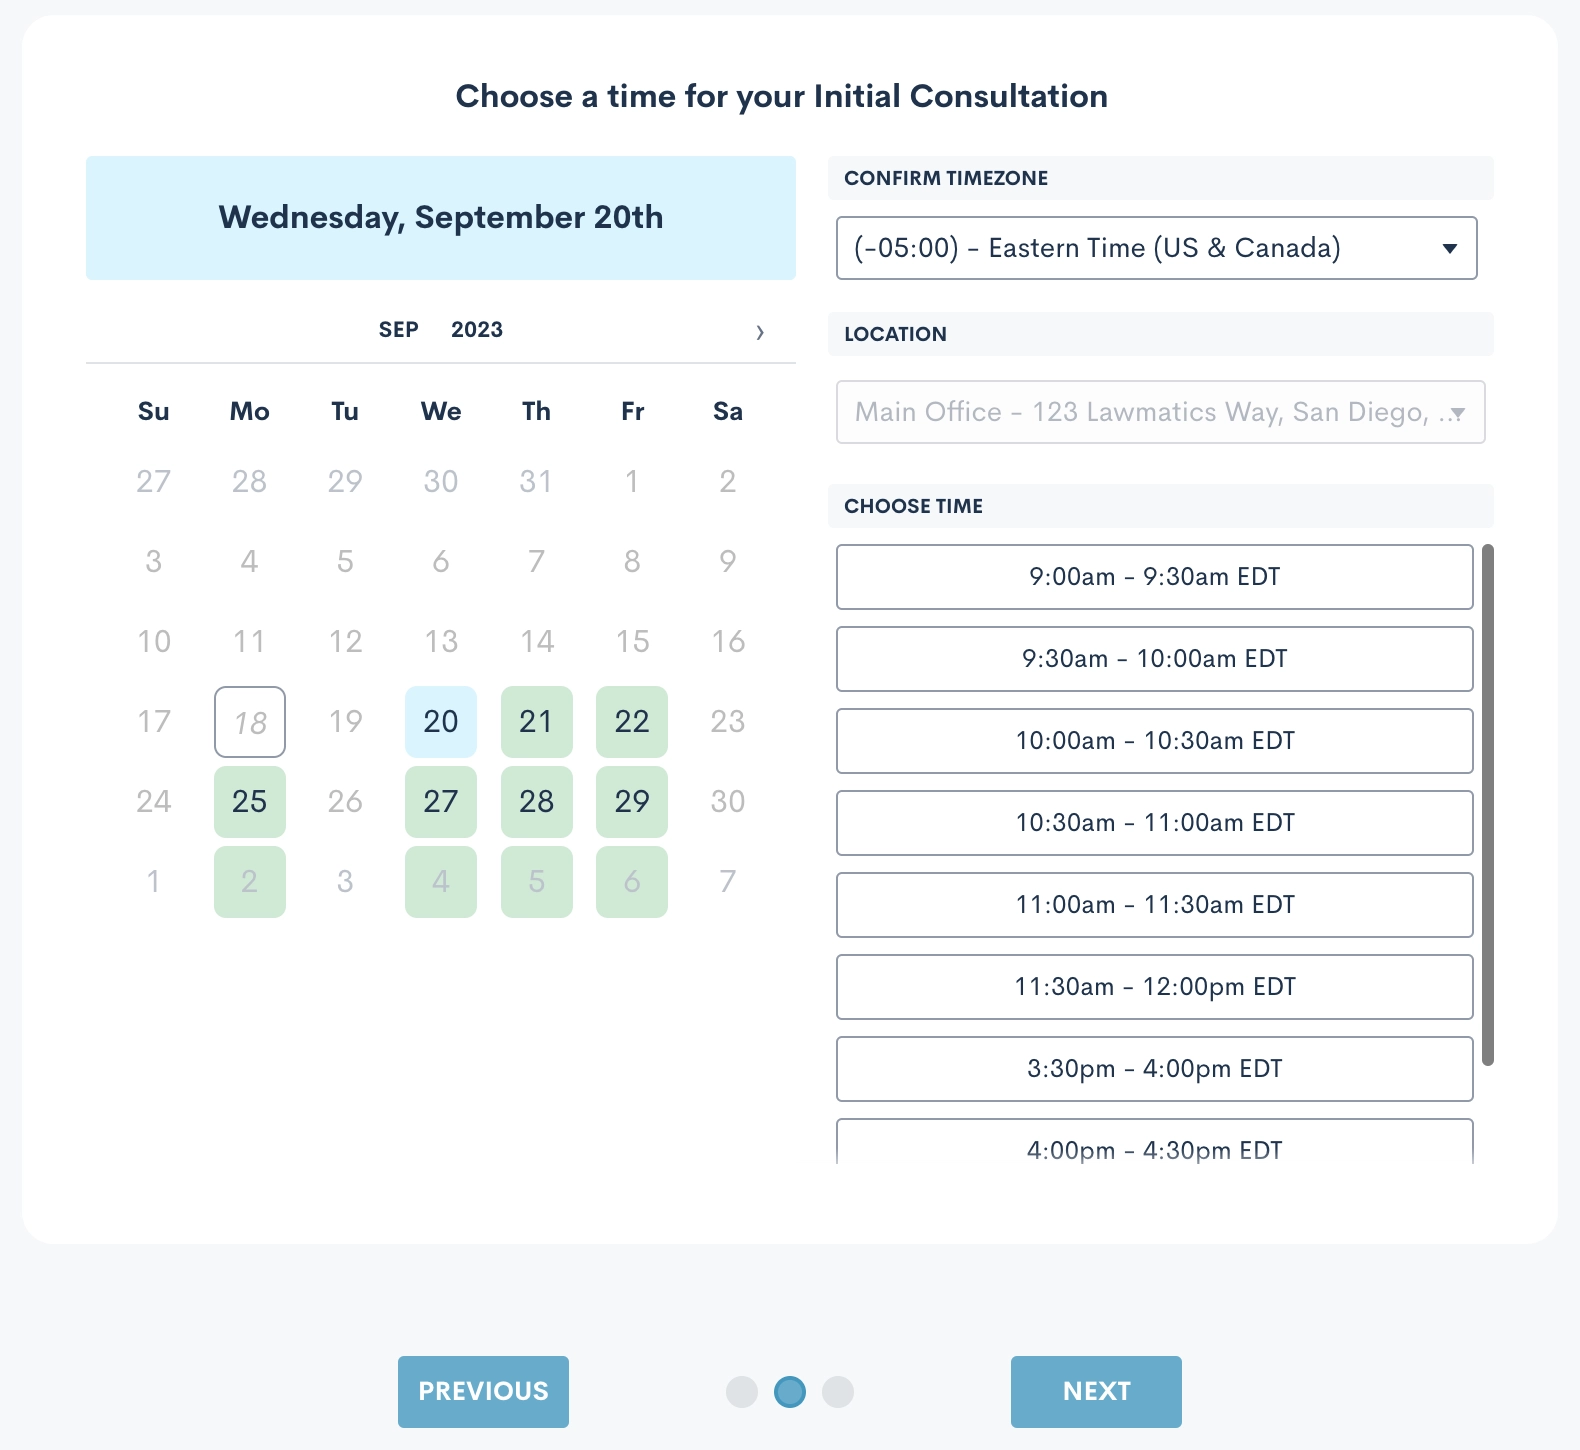
The Booking Request tool is ideal for scheduling appointments directly from a custom form, taking the host's availability into account and preventing double booking. After adding a booking request to the form, click on it to specify appointment details.
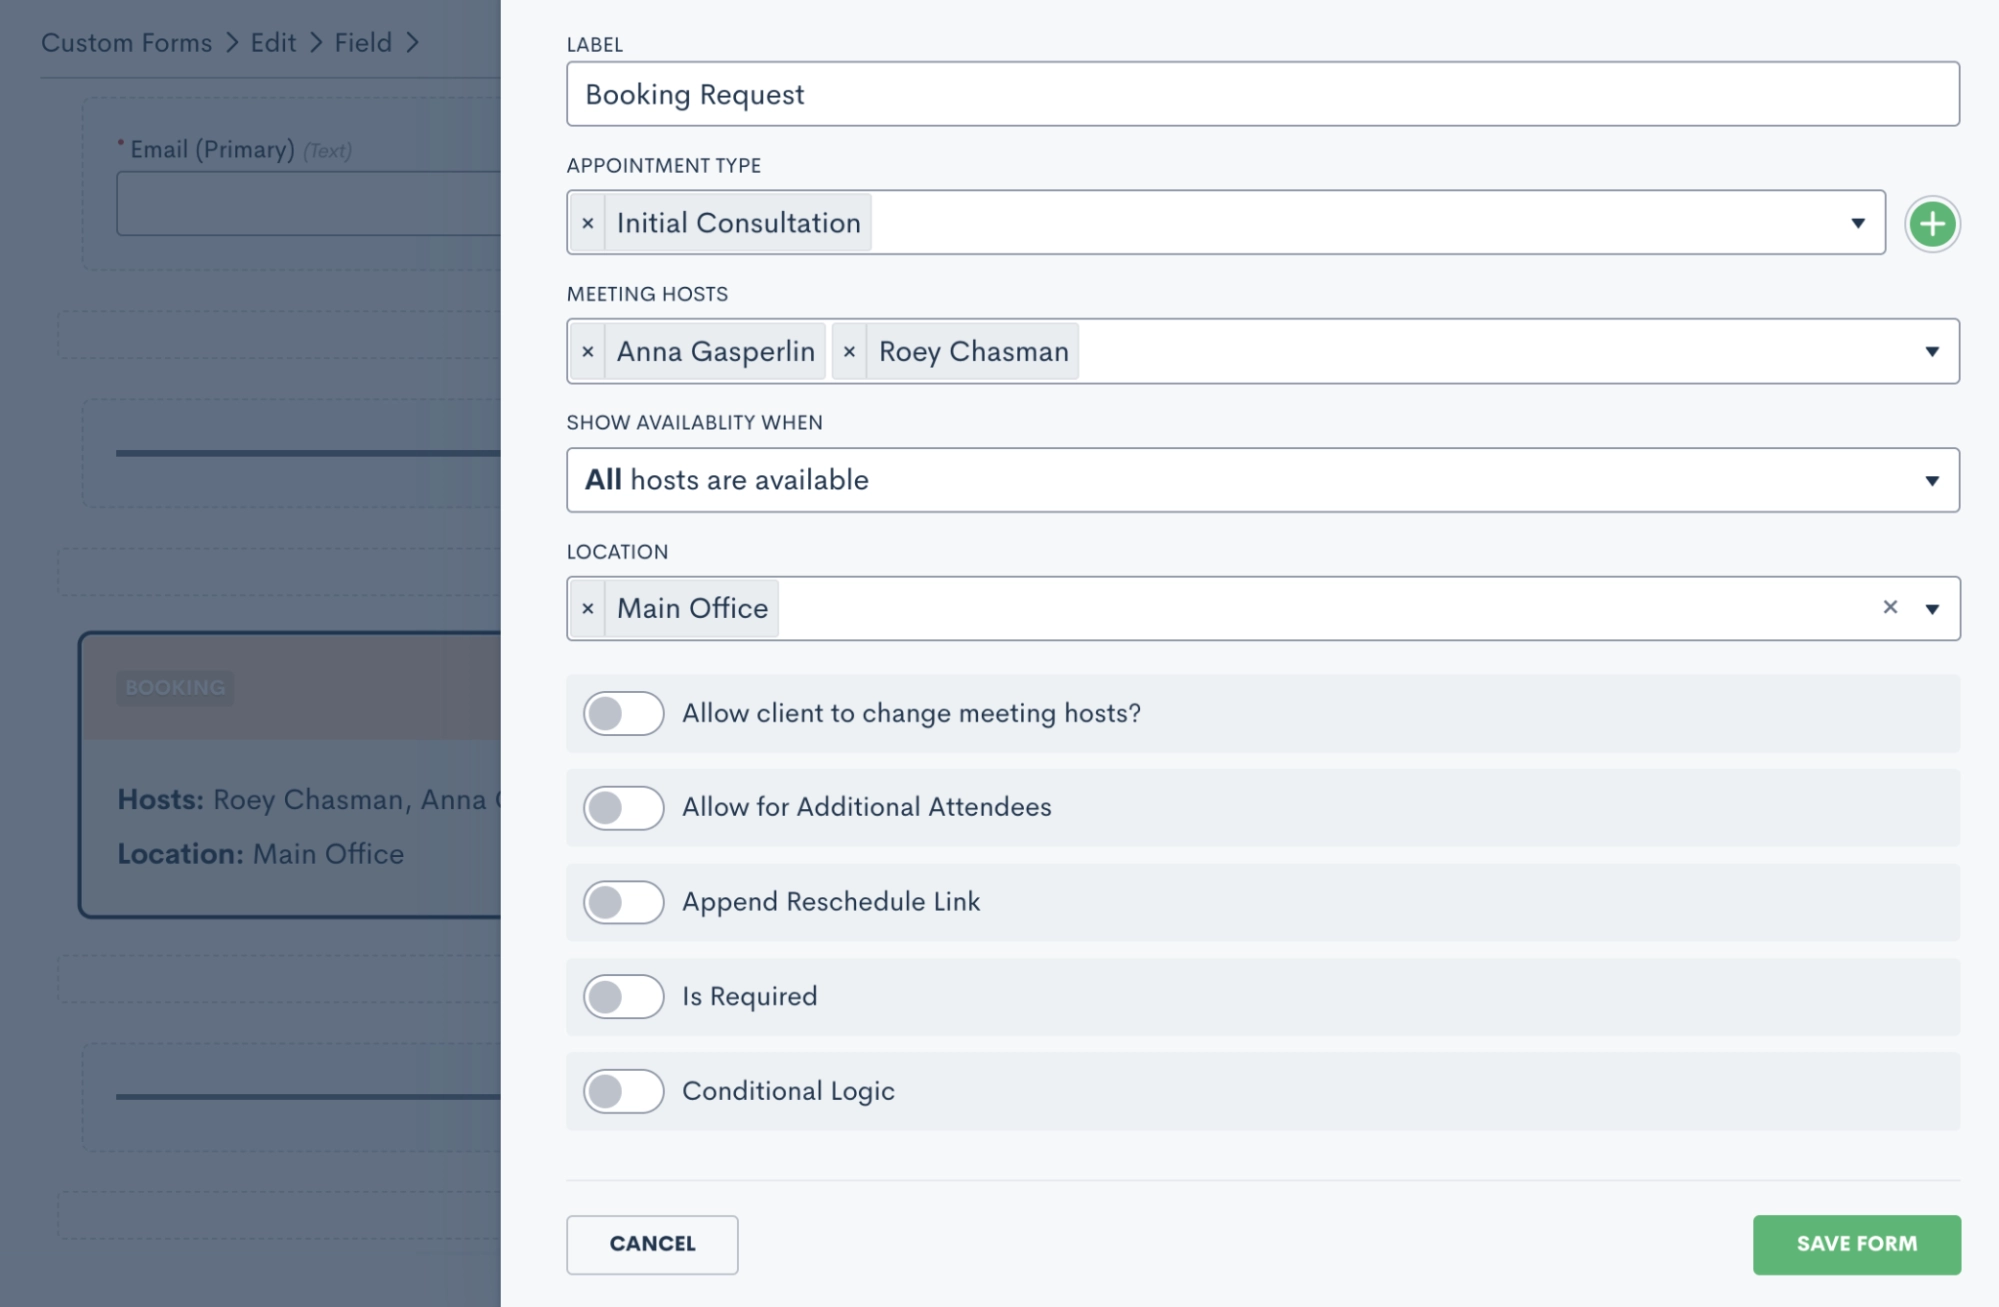
When clients complete this form, they'll encounter a calendar module where they can view the host's available time slots, select their preferred day and time, and confirm their appointment.
If appointment booking is the primary purpose of your form, consider using a booking form for a more streamlined experience.
Final settings
Once you’ve constructed your form, incorporating all these advanced components and features, there are a few final settings that can enhance the overall experience when sending and submitting this form.
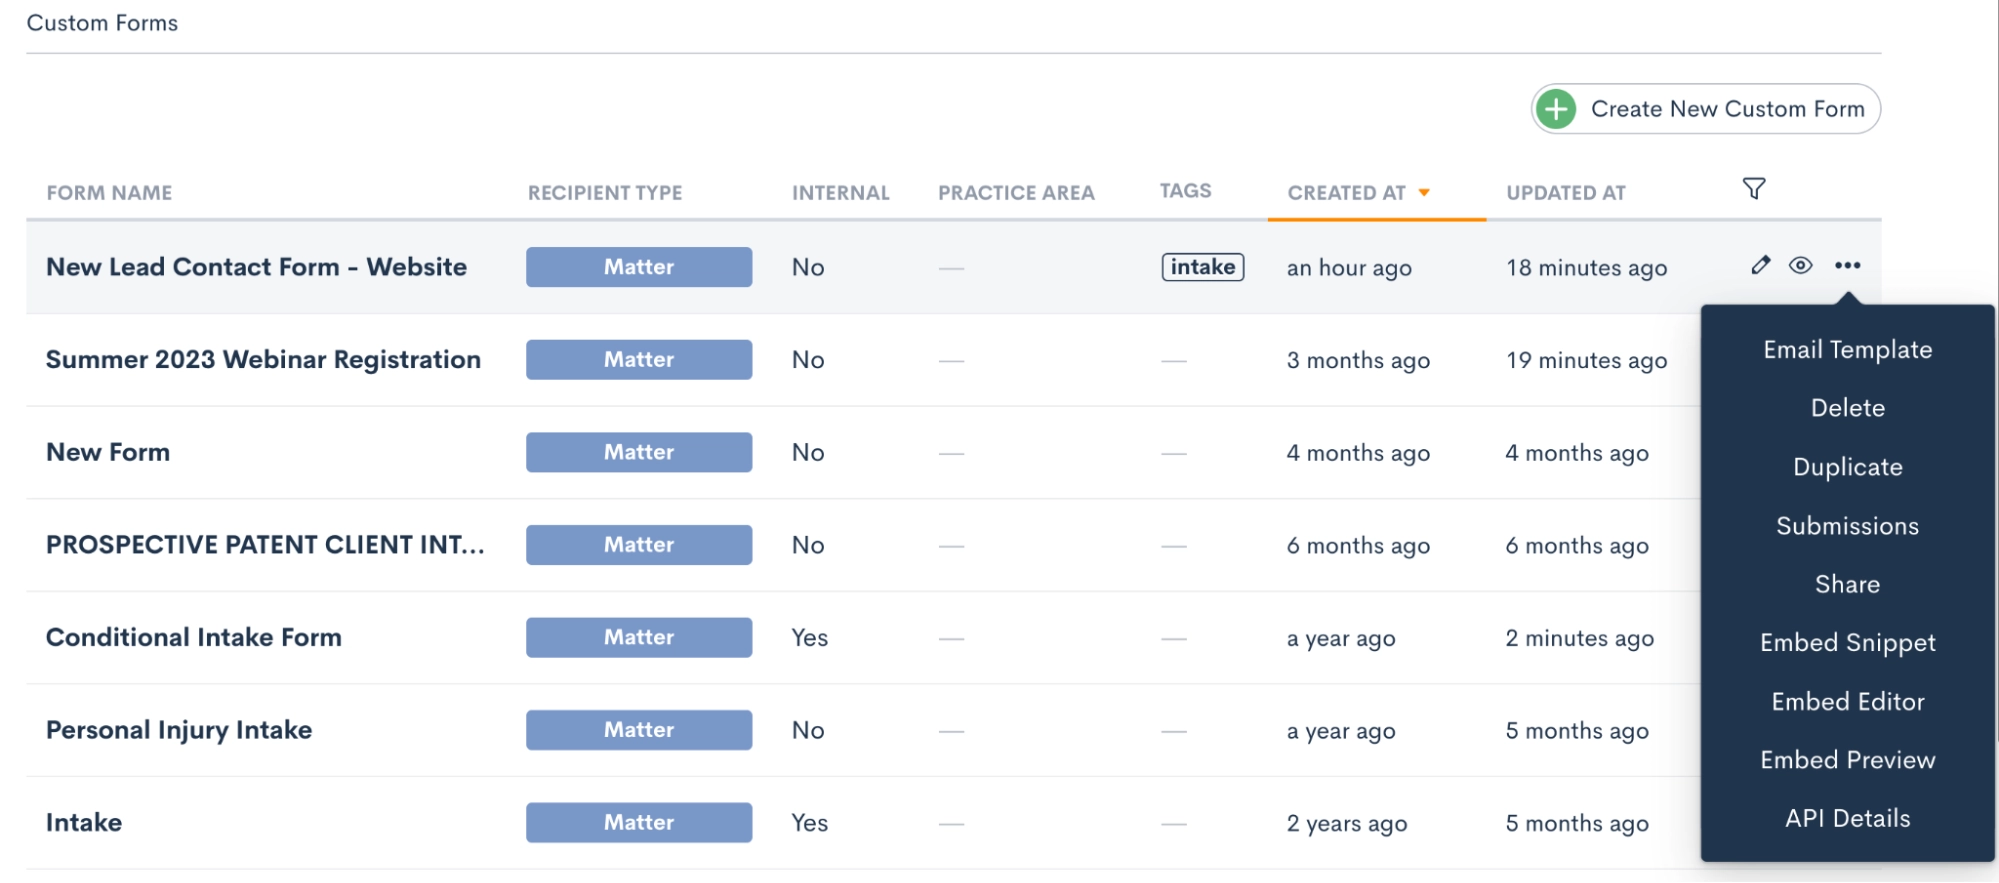
To access these additional options, navigate to the main Custom Forms page, displaying all your firm's forms, and click on the ellipsis icon (…) on the far right for the specific form.
Custom email template
While optional, the custom email template is a valuable tool for ensuring all firm communications are personalized and aligned with your brand.
After clicking "Email Template" (as shown above), you can create a plain text email template for sharing this specific form, document, and more. You can seamlessly incorporate fields using the dropdown menus. Don't forget to input the custom link for the form.
Whether you're sharing the form manually or through automation, you'll have the option to send it with your custom email template.
Embedding & styling
If you don't already have a "Contact Us" form on your website, it's highly recommended to add one, and Lawmatics makes this process straightforward.
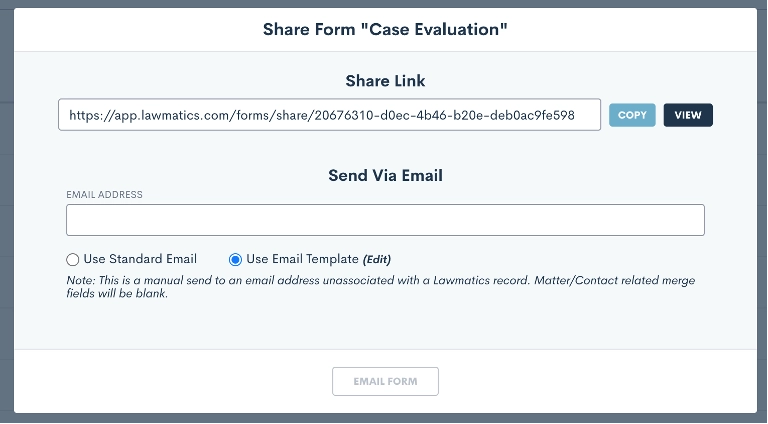
First, create the form by adding the fields you want to capture. Then, copy the Embed Snippet from the ellipsis menu, as shown in the images above, and paste it into your webpage.
Once the form is embedded, you can further customize its appearance in Lawmatics. Click on "Embed Editor," also accessible from the ellipsis menu, to make styling selections.
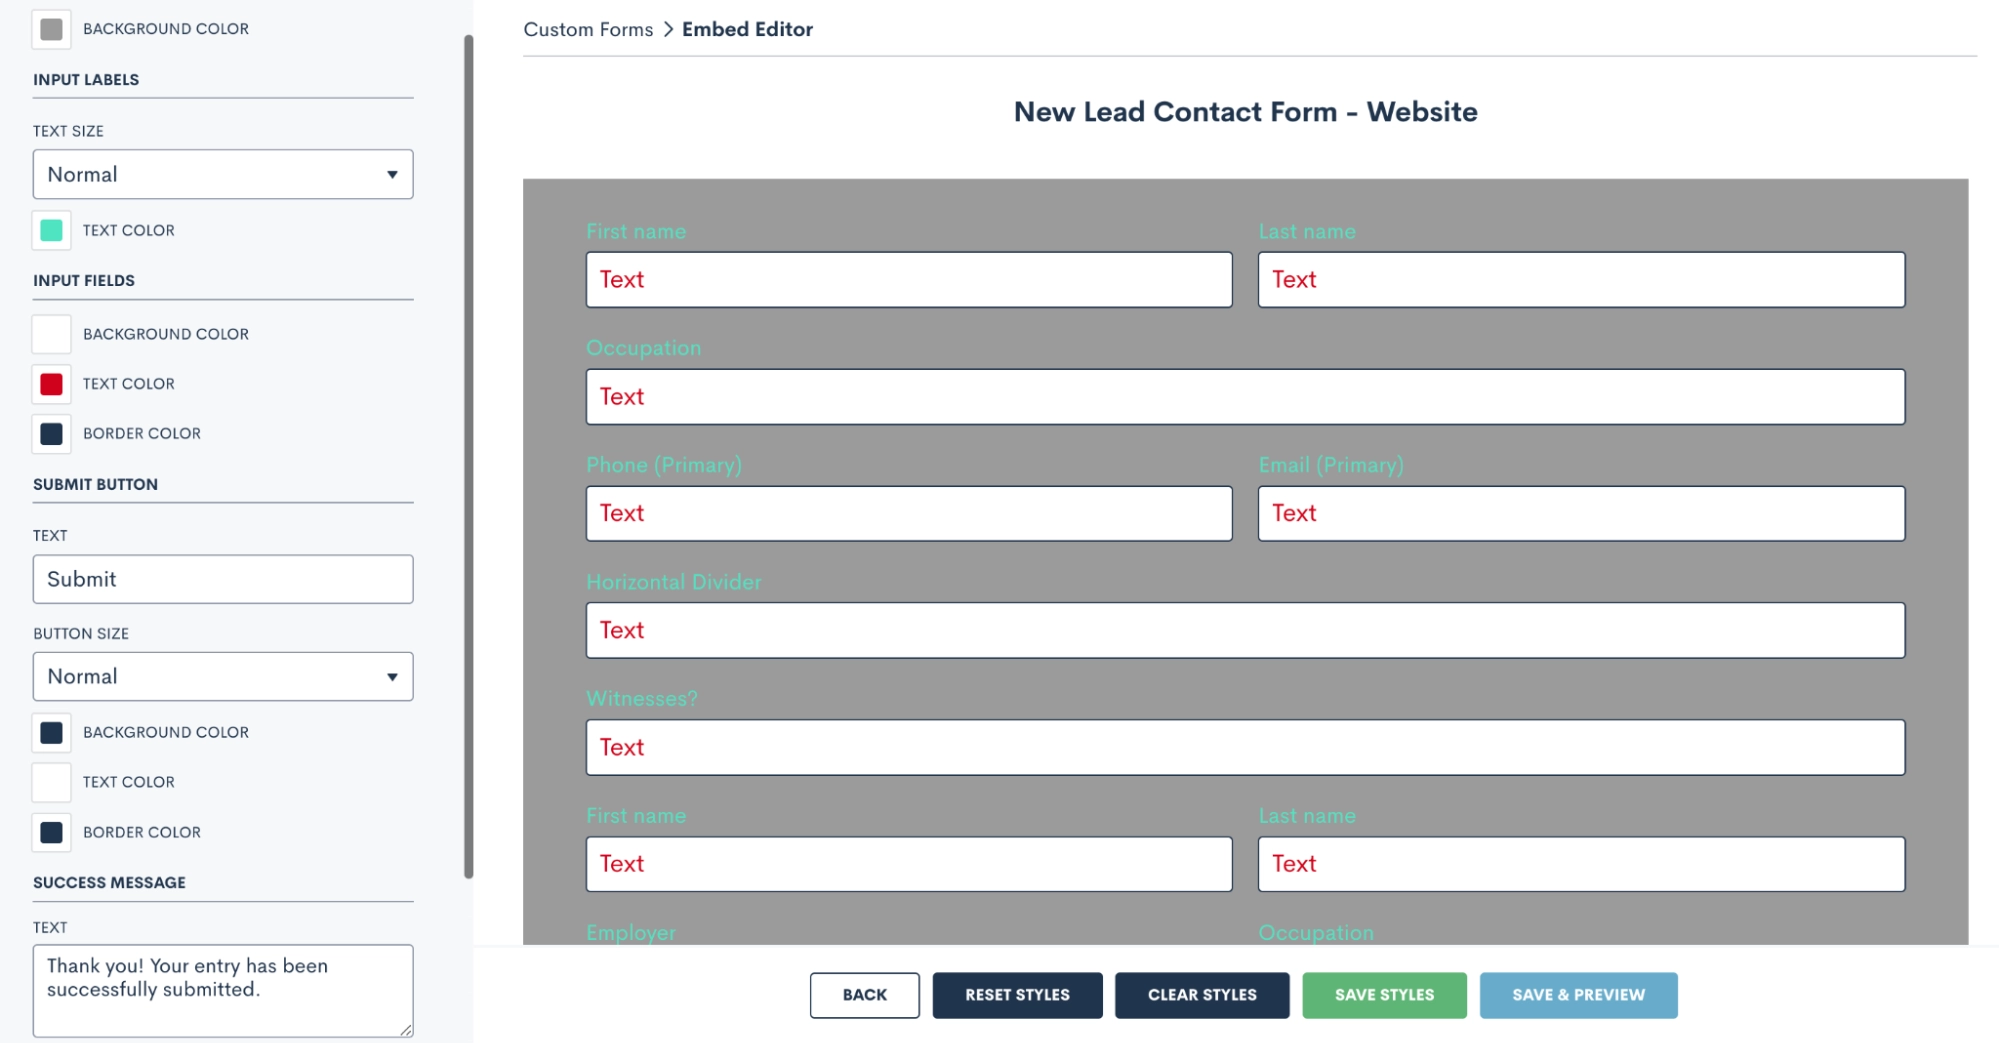
You can adjust background and text colors, submit button text, success messages, and more to ensure the form seamlessly integrates with your website's aesthetics.
API Details
Utilizing the Lawmatics open API is considered an advanced feature and typically requires web developer expertise. However, it's a powerful tool to connect your existing web form to Lawmatics.
You can access the API Details once again by clicking the ellipsis button.
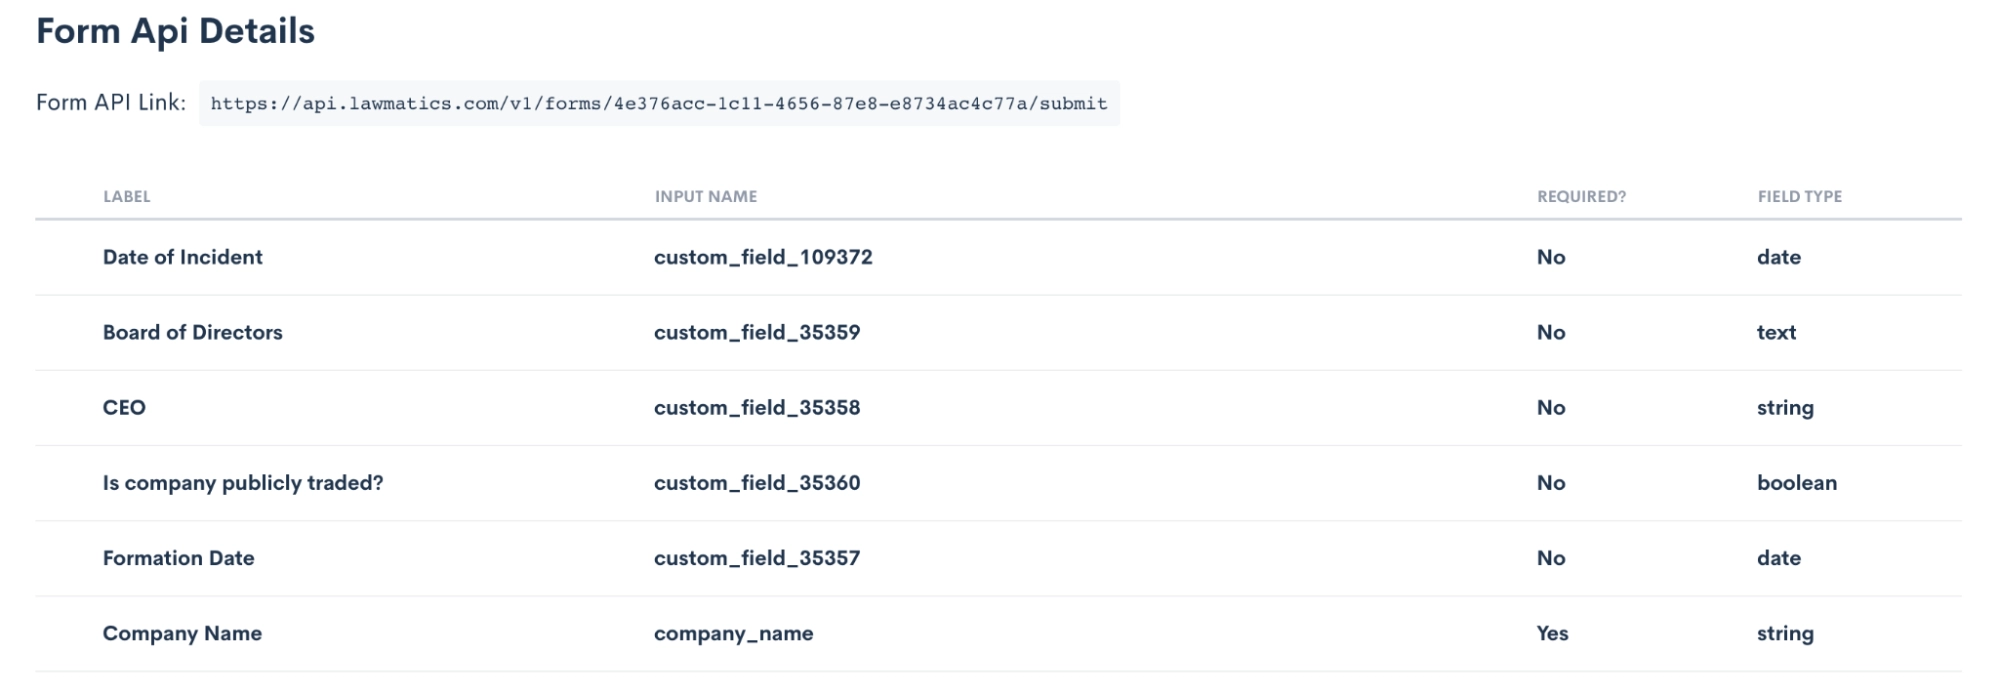
Your developer will use this information to establish a connection between your existing form and Lawmatics.
Conclusion
Custom forms represent a cornerstone of the Lawmatics platform, and unlocking their full potential can significantly benefit your operations. While you may already have a strong grasp of the basics, delving into the more sophisticated aspects of custom forms can open up new possibilities.
These advanced tools enable you to collect client information with precision, ensuring you capture everything essential. Whether it's conditional logic, repeatable relationship blocks, or file uploads, there may still be hidden features waiting for you to discover.
As we conclude, remember that custom forms offer a wealth of potential. By embracing the insights of the Lawmaticians and the strategies of seasoned Lawmatics users, you can harness the full power of form creation to elevate your practice to new heights.