Deep Dive Recap: Ditch Pen & Paper for Document and E-Signature Automation

Register for upcoming Monthly Deep Dives here.
Step into the paperless revolution with Lawmatics, where document drafting and e-signature requests are made easy and efficient. Say goodbye to the tedious tasks of physical document handling, printing, scanning, and mailing, and embrace a seamless and modern approach to legal processes. With Lawmatics, your firm's lawyers and clients can sign documents electronically from anywhere, at any time, making the whole experience hassle-free and convenient.
Document templates allow for increased consistency and accuracy with your document drafting. Let Lawmatics handle the intricacies of merge fields, conditional logic, and fillable text fields, saving you time and hassle. Our document templates are versatile and highly customizable, ensuring that you’ll be able to set up your documents exactly how you need them.
PDF Document Templates
The first of our three types of document templates is PDF Upload. With this type of template, you will begin by uploading a base PDF file, and then you’ll drag and drop any merge fields or signature fields over the base file. For that reason, this is a great option for:
- Court documents
- Authorizations
- Forms from external organizations
- And more
This will help you create documents that are identical to the original base version provided.
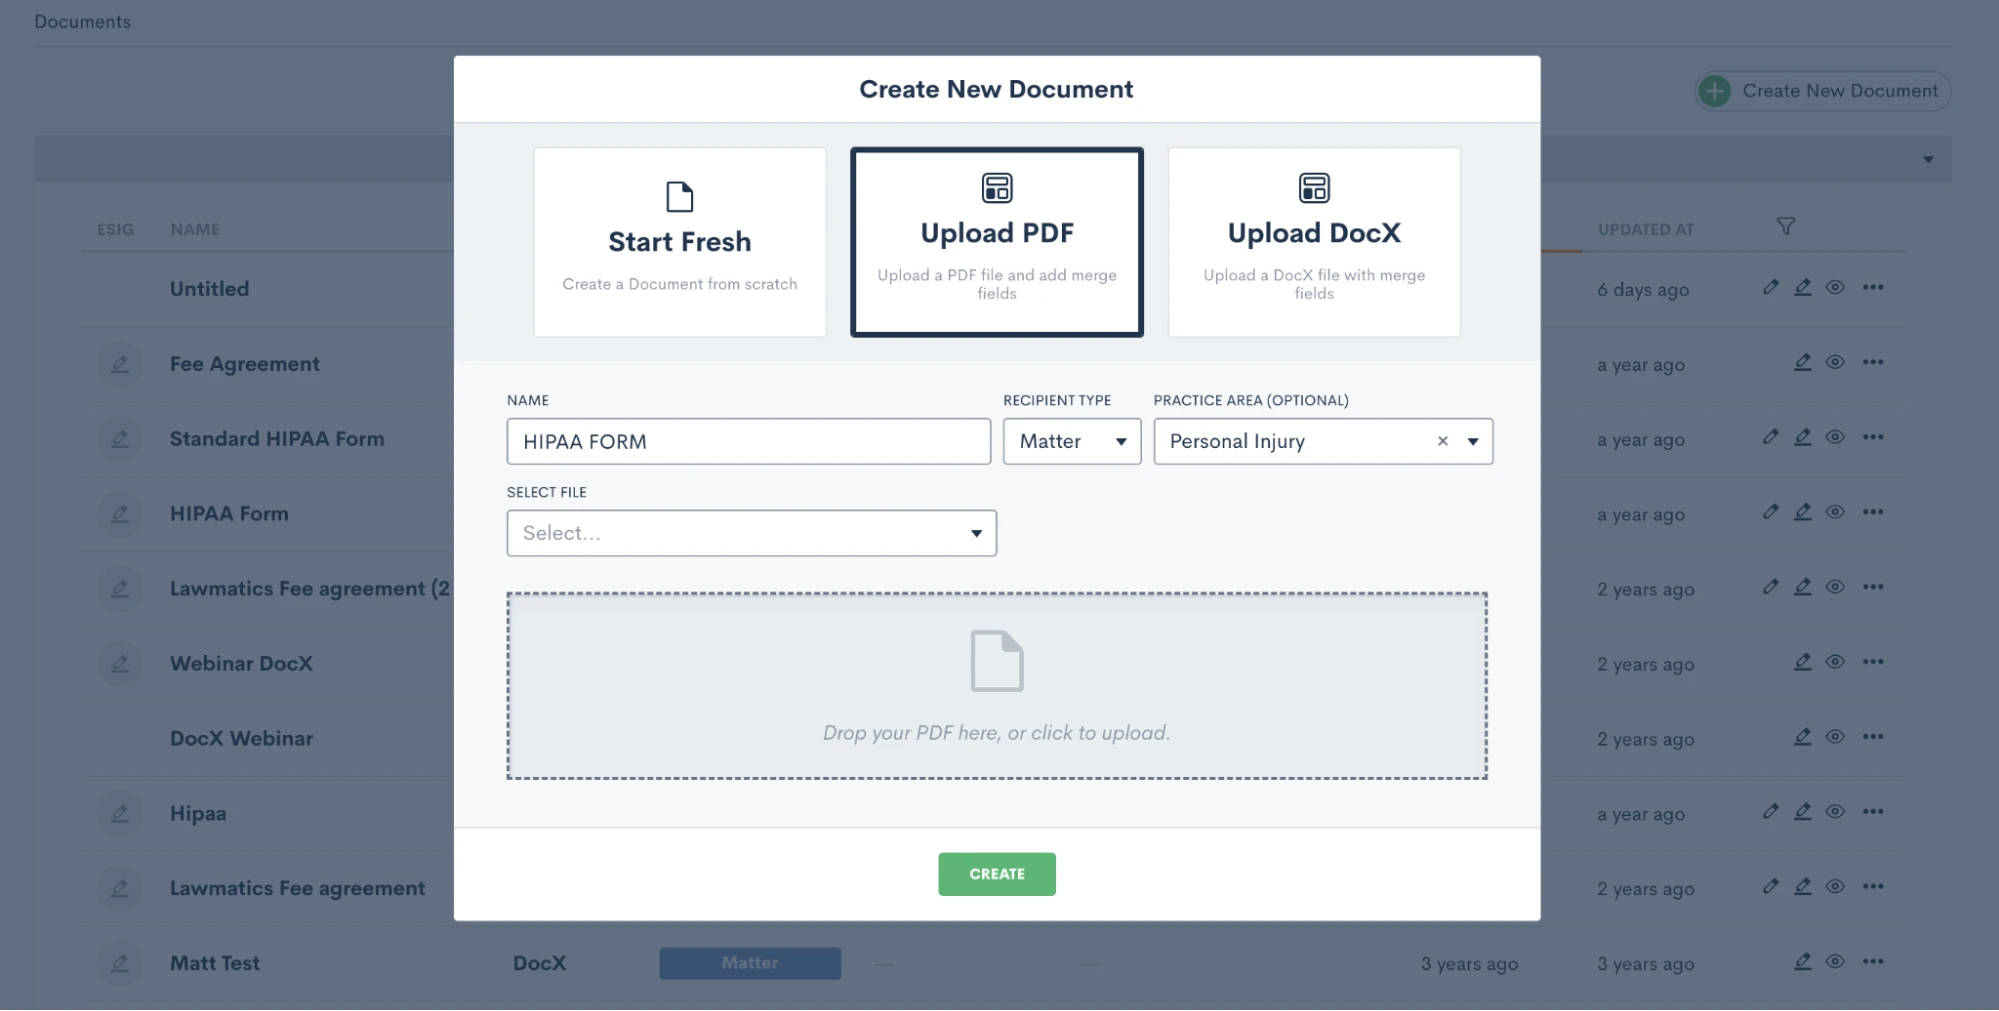
How to create a PDF Document Template
- Navigate to the Documents page under the Assets tab
- Click the button to create a new document
- Select Upload PDF
- Give your document a name,
- Select Matter as the type (for anything client/case related)
- Select a practice area if desired (or leave blank)
- Drop a PDF file in the box to upload
Again, it’s important to note that the PDF file will remain as-is when it is uploaded. So be sure to leave the appropriate amount of space for blanks, fields, etc.
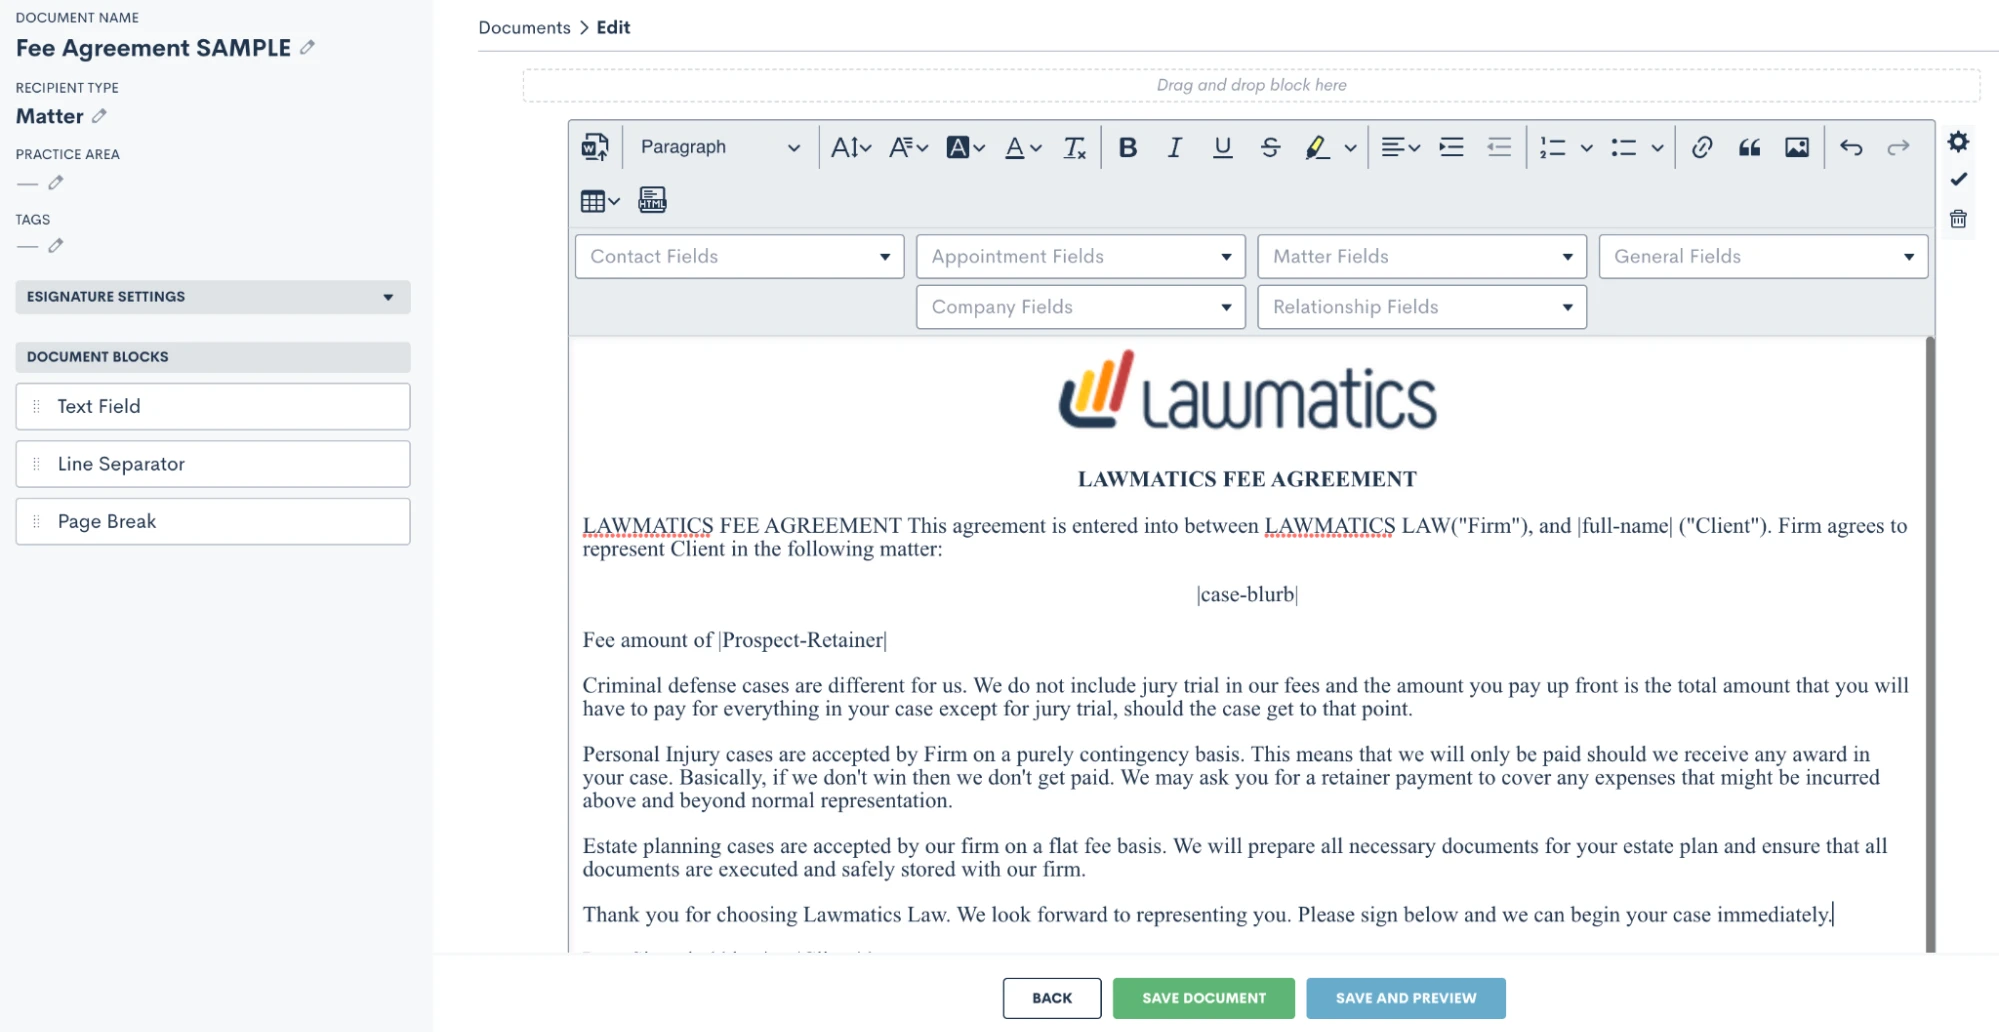
How to merge data from the matter into your Document Templates
Once the document is uploaded, you will see field elements on the left sidebar that can be dragged and dropped into the document. These fields can be used to merge data from the matter, or as open text fields for the client to type in.
Start by merging in the client’s name. Your first step is to drag a Text field onto the document wherever you would like it, then click on it to set the properties as shown below.
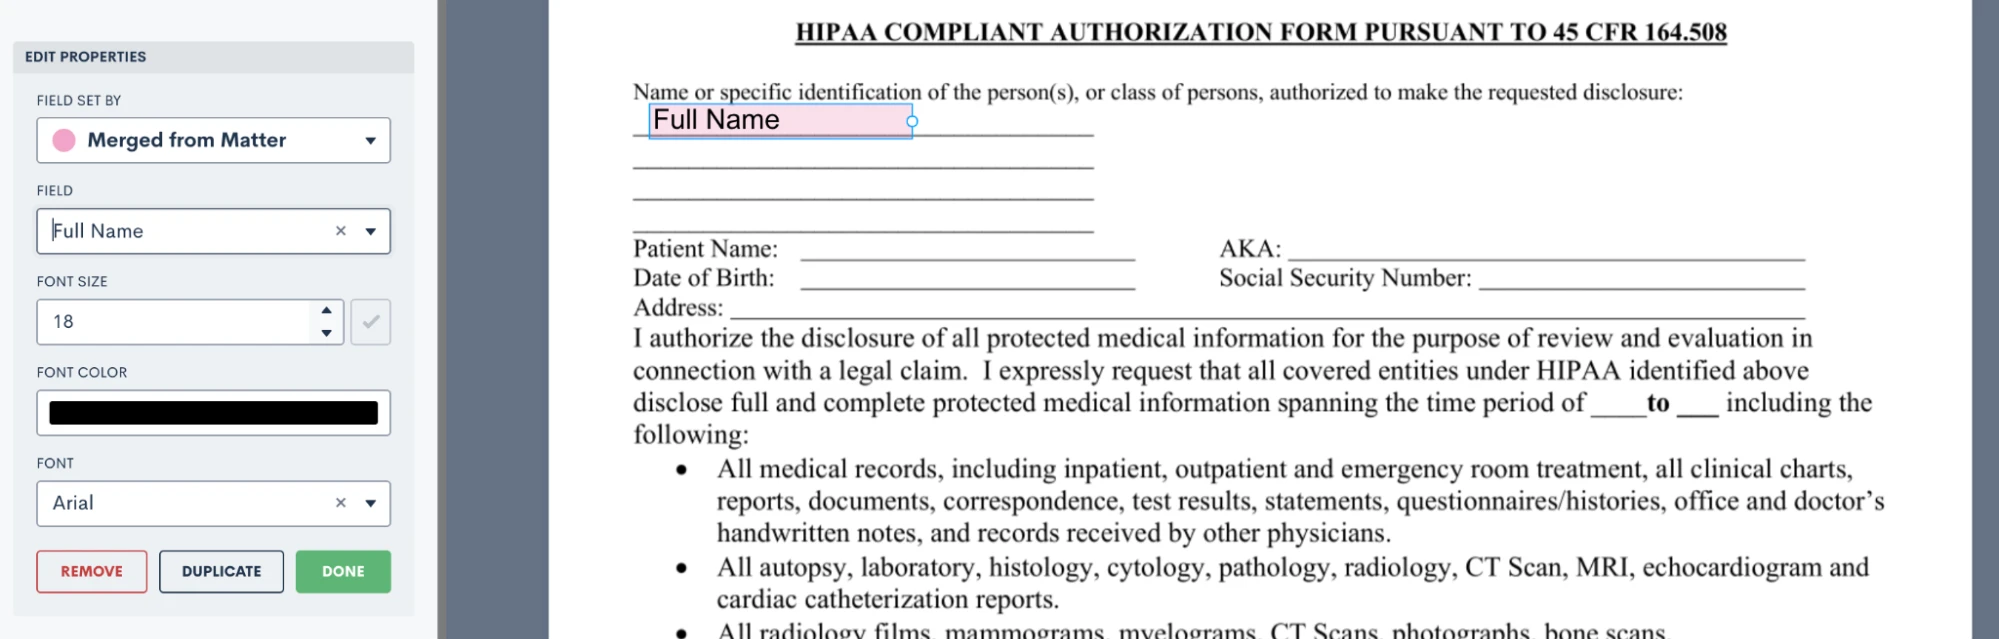
To merge data, such as the client’s name, simply select Merged from Matter in the dropdown for Field Set By, and then select which Field should be merged there.
If this document requires e-signature, scroll down on the left sidebar to the section labeled ESignature Settings. Here you can feel free to add as many signers as you need, whether on the client or the firm side.

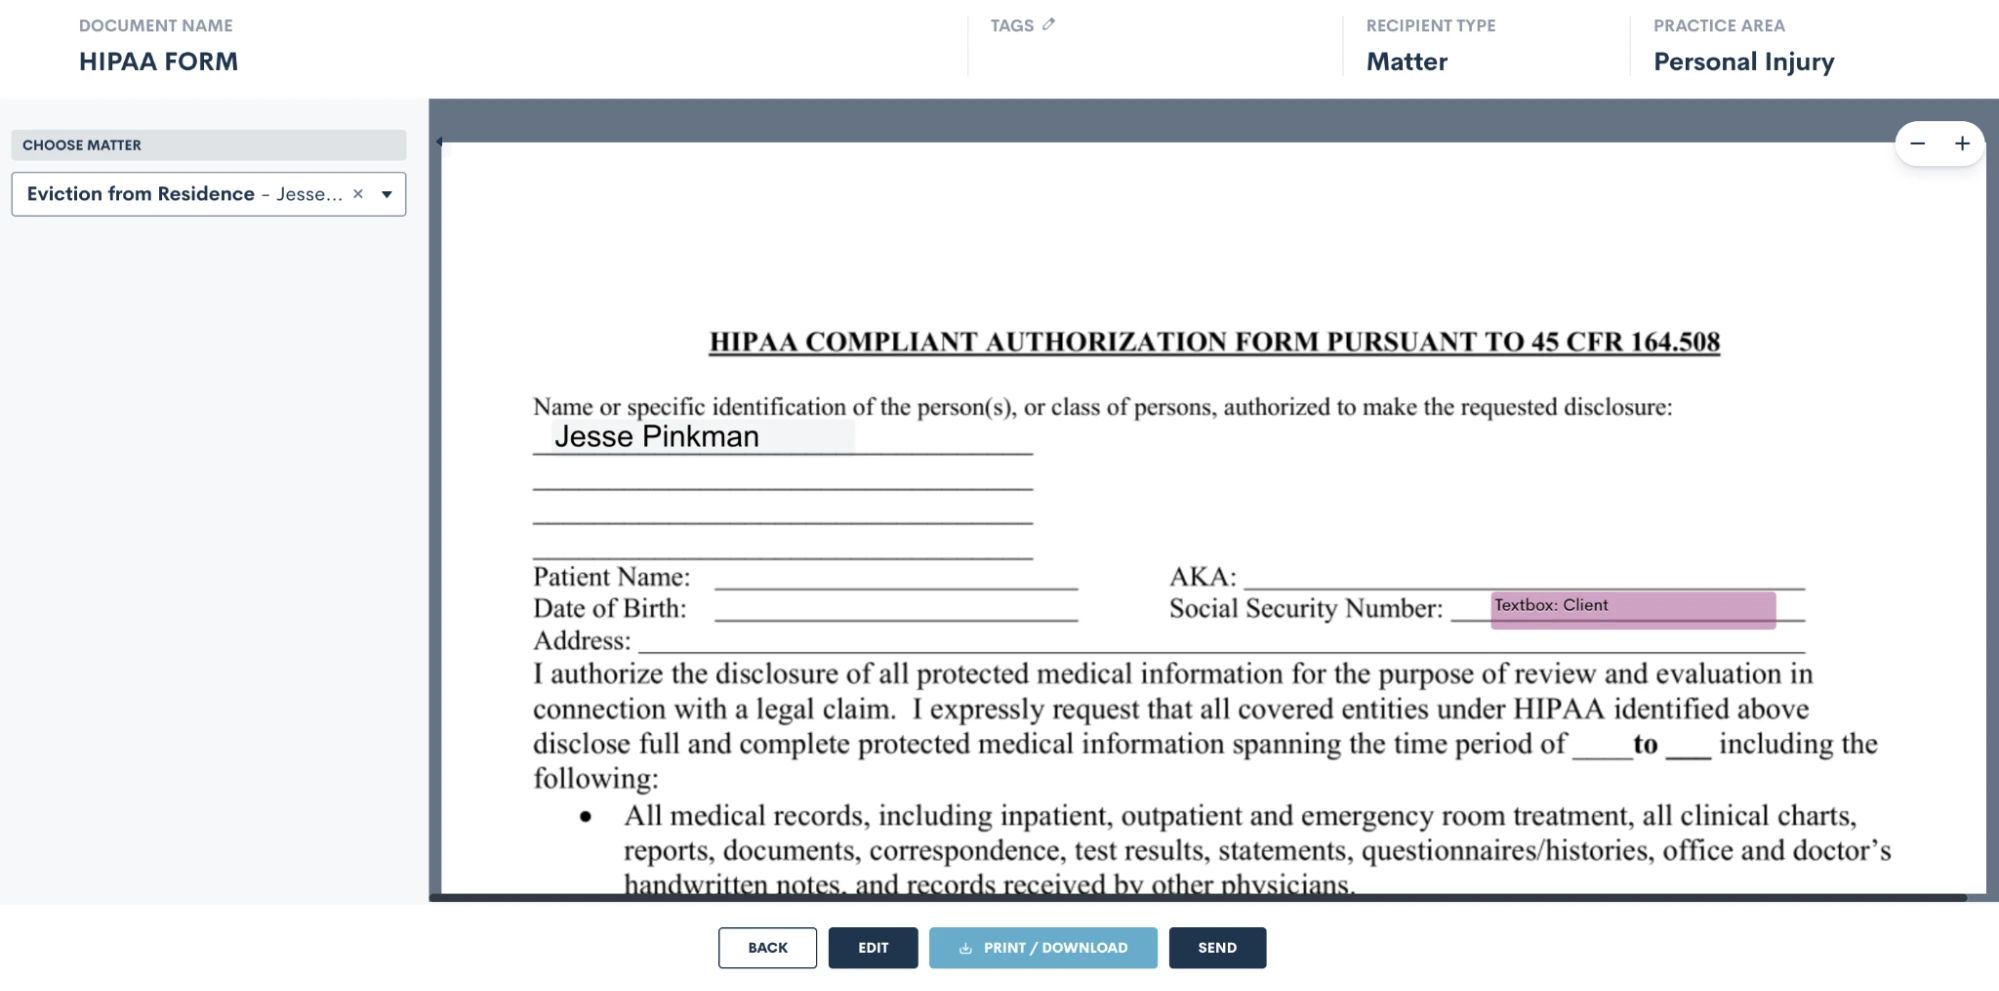
Once you have added your signer roles, you can now add e-signature fields into the document. You’ll see options for signature and initials as well as text. Text fields prompt the signer to simply type in information, such as social security number or date of birth. Select what you need and drag it onto the document. Then, in the section labeled Field Set By, select the signer role who needs to fill in that field, “Client” in the example below.
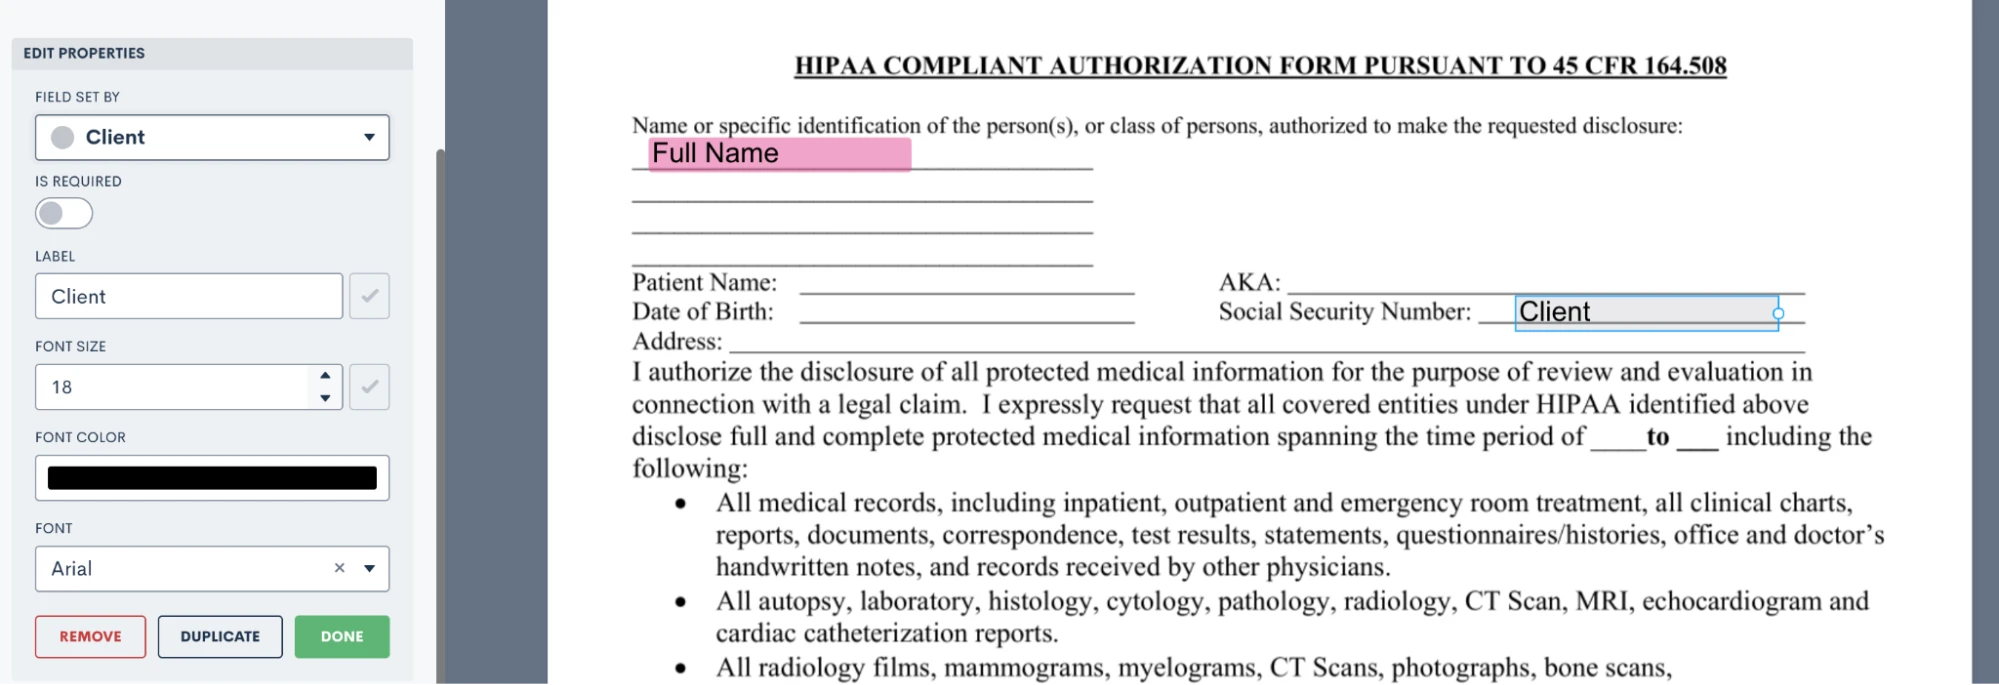
Now when this document is sent, it will prompt the Client signer to fill in that field accordingly.
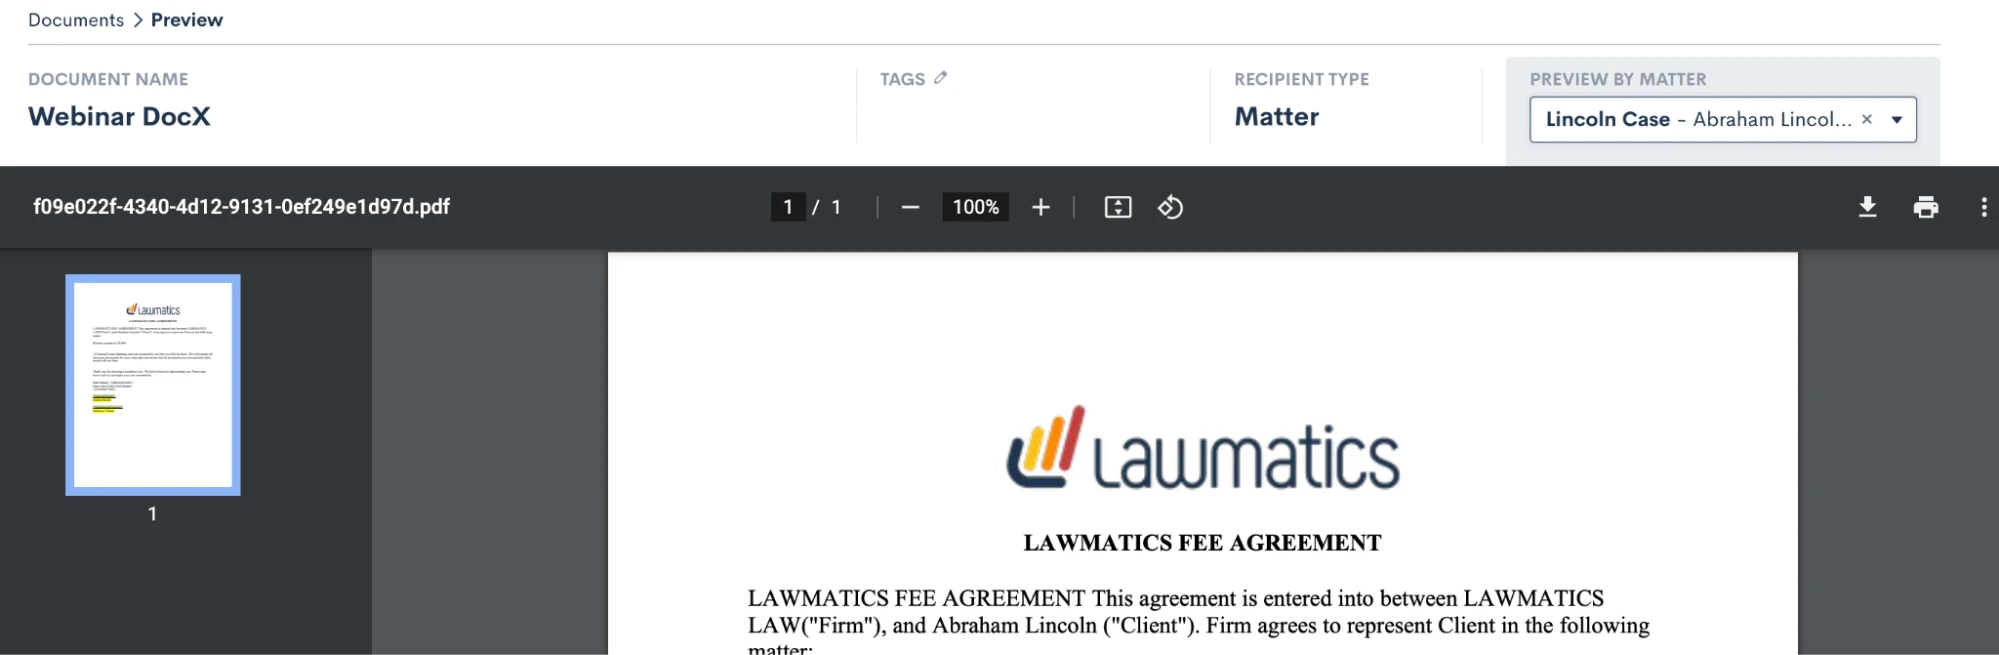
Take your time dragging and dropping all of your fields onto the document, then preview the document to see what it looks like with a particular matter’s information merged in.
Use the selection drop down on the left to choose a matter, and then that matter’s fields will be filled into the document template for previewing. Easily send or download from there.
DOCX Document Templates
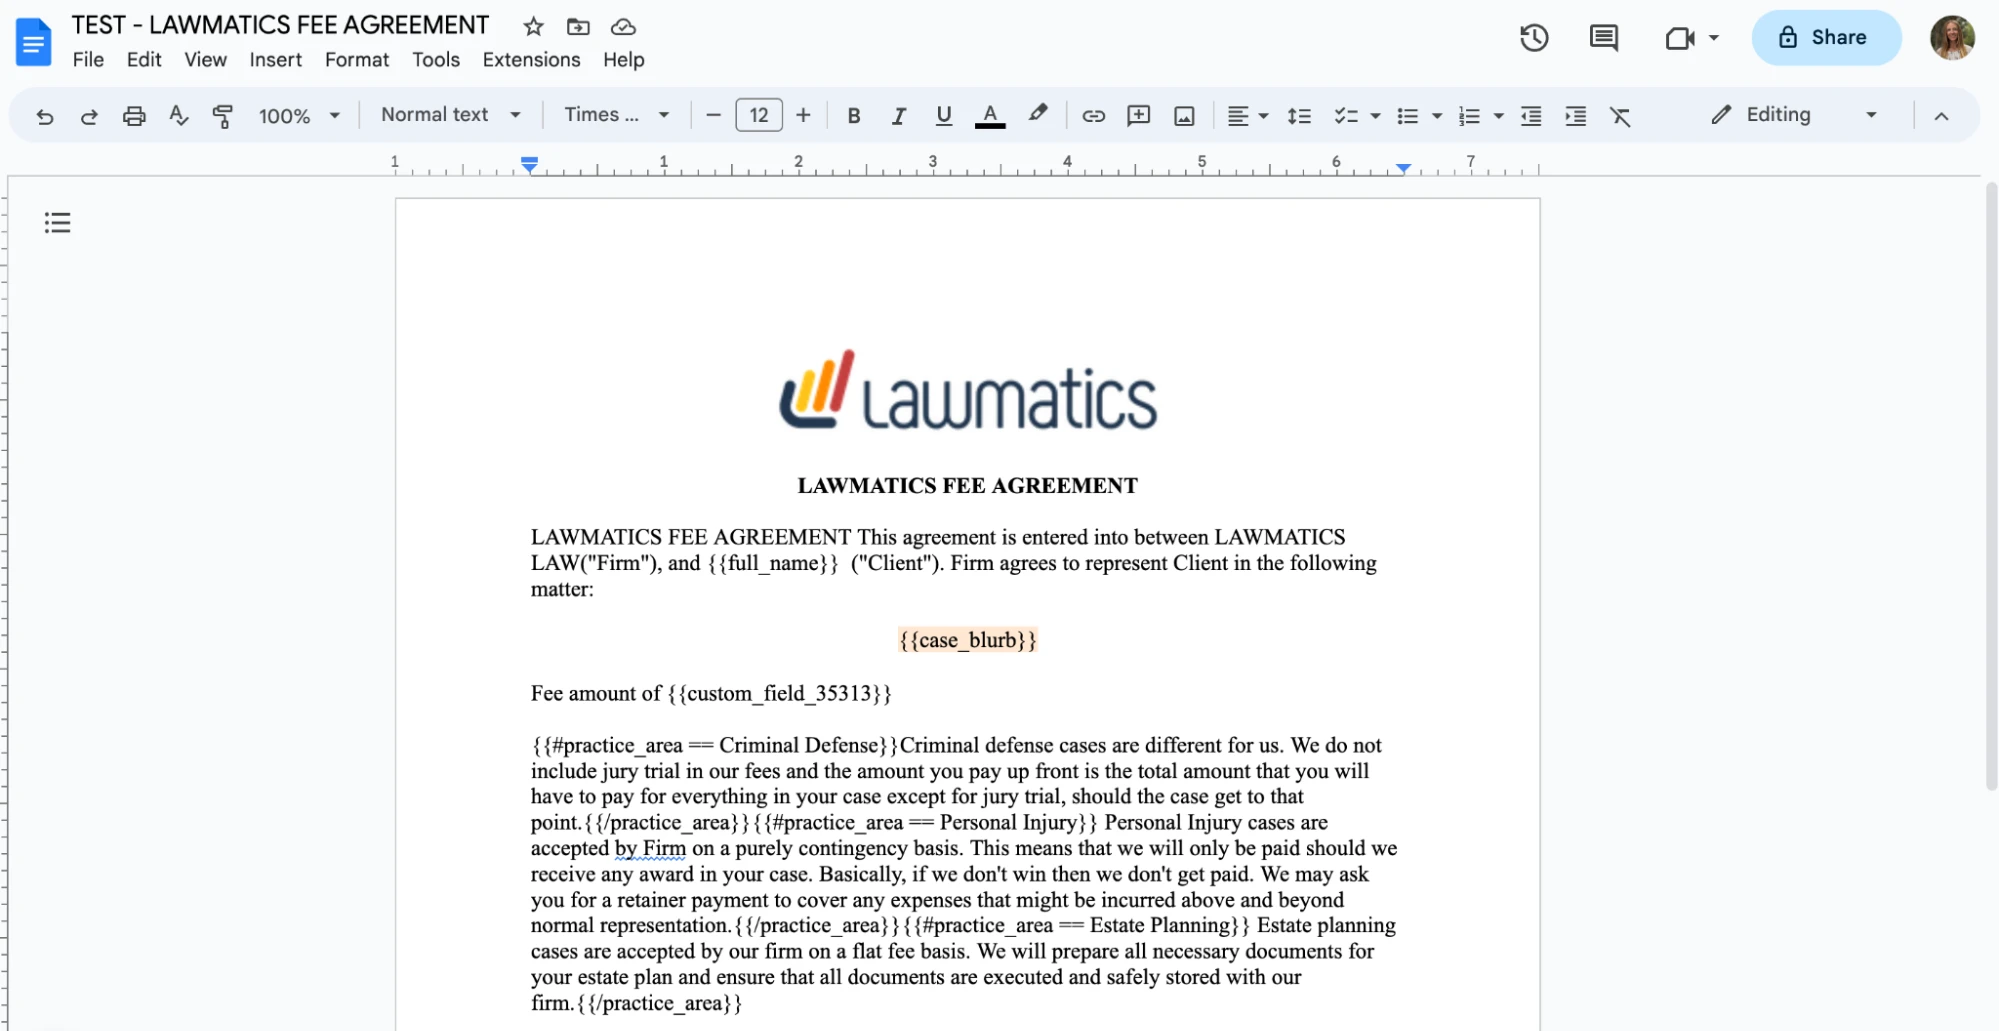
Create and edit DOCX documents seamlessly outside of Lawmatics using your preferred word processor. Just like our other document templates, you can easily merge fields and utilize conditional logic with these templates.
While crafting DOCX templates might require a bit more effort, they offer unique advantages not found in our other options. These versatile documents can serve various purposes such as:
- Fee agreements
- Internal firm documents
- External court documents
- And authorizations
How to create a DOCX Document Template
To get started with this type of document, we recommend opening the DOCX Field Reference guide. You can access this guide by simply hovering over the question mark icon near the top right of your Lawmatics window.
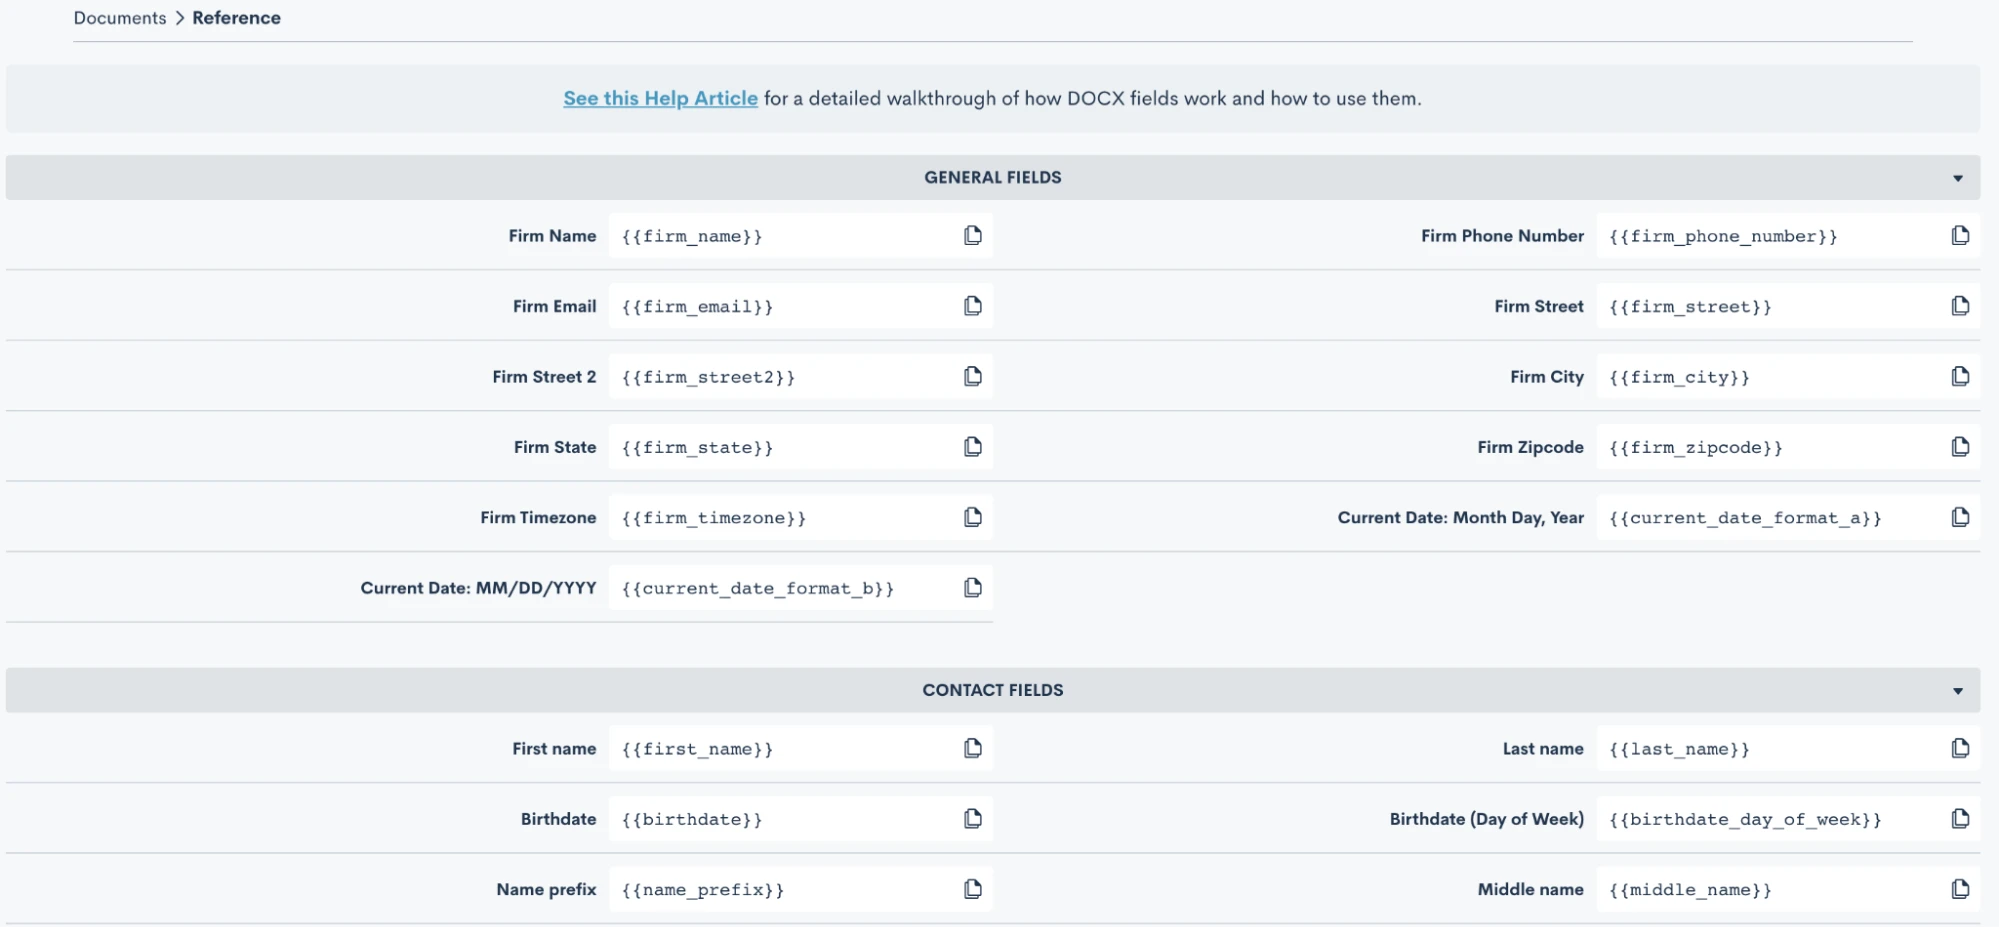
Here you will find the codes for all of your fields, including custom fields. Copy and paste these codes into your word document, and when the document is uploaded back into Lawmatics the field will merge in accordingly.
You can also add e-signature to these documents. When you go to the DOCX Field Reference page, mentioned above, scroll all the way down to the bottom and you will find a guide for using signature fields. Simply follow the guide provided to copy and paste signature fields into your document just like you would do with merge fields.
Once you have made all of your edits in your word processor, it is time to save the document as a .docx file and upload it into Lawmatics. At this point, do make sure you have made all necessary edits to the document base including grammar, merge fields, page numbers, header/footer, etc, because you cannot edit the content once it is uploaded into Lawmatics.
After you have uploaded the file, it will appear in Lawmatics exactly as it did in your word processor. You’ll now have the option to preview the document by matter by simply selecting a matter from the drop down menu in the top right, shown below, and you will then see your fields merged.
From here you can always send the document manually, or preview and download it back as a .docx file with the fields merged in.
Start fresh custom Document Templates
Last but not least, our third option for creating document templates is the Start Fresh option, also referred to as Custom Documents. With this template, you will be using the Lawmatics built-in word processor to build your document right in Lawmatics.
To get started you can either type your text right in, copy and paste text in, or use the Word import button to import the text right from a word document. You’ll then see something like this:
Above you’ll see some fields merged into the document. This template option makes merging fields very easy, because you’ll simply select them from the drop down boxes shown above and the fields will be merged right into the template.
Conditional logic is also a key part of this template type. You may have certain paragraphs or sections of your document that should only apply conditionally, to make this happen you’ll drag over additional text fields (from the left sidebar menu), put the conditional text inside, and then set the conditional logic using the gear icon on the far right. You’ll set your logic like so:
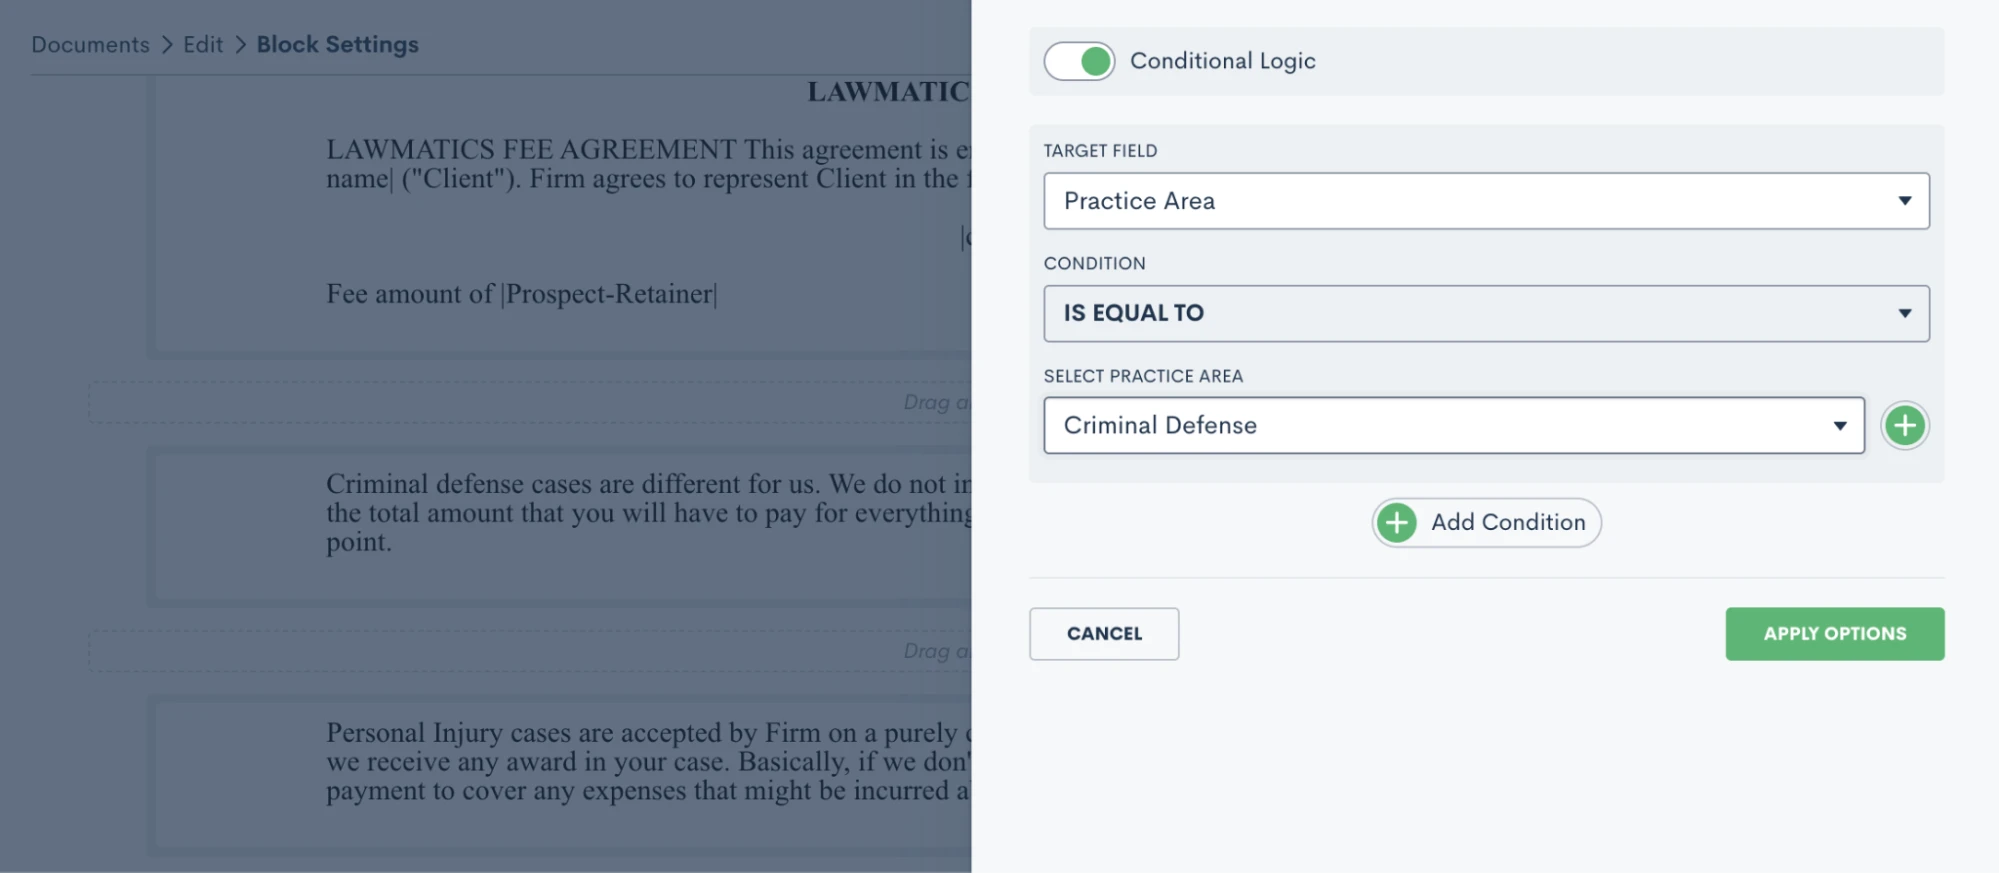
Practice area is a common field for setting conditional logic, but feel free to use any field in your CRM including custom fields.
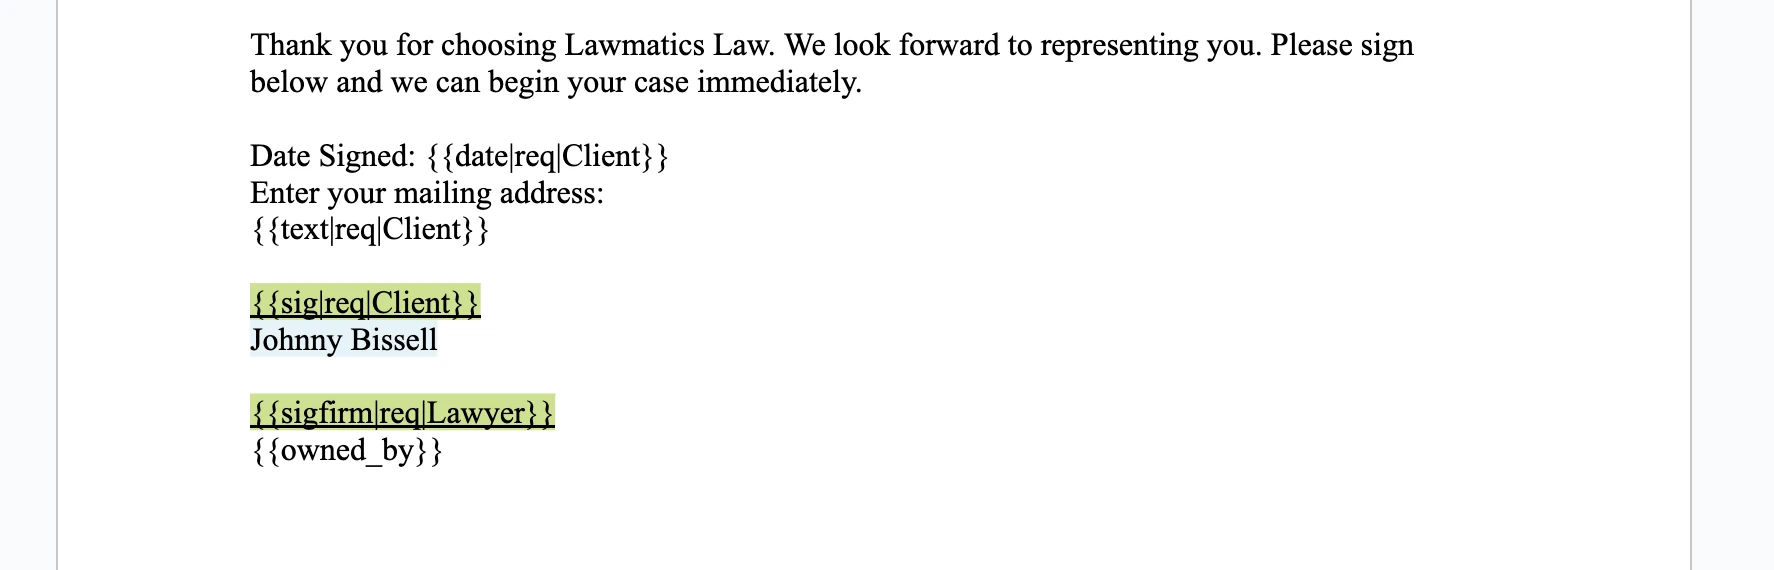
You’ll often want to add e-signature to this document. To do so, click to expand the e-signature settings section on the left sidebar and add as many signers as you need. Remember, your signers could be from the firm or on the client side. You’ll then use the signature fields drop down to add in any signature fields such as initials, date, signature, etc.

Be sure to save your document, and then it’s ready to go!
Review a more in-depth comparison of the three Lawmatics document template types here.
Using document templates in Automations
Each of the above three templates can always be previewed for a particular matter and sent out manually when desired. More often than not, you will opt to build your documents into Automations so that they can be sent and signed automatically.
Before we move onto Automations, let’s also take a look at your options for Custom Email Templates for documents as well as e-sign reminders. Go to your Documents page under the Assets tab, and then click the … icon on the far right for any document. You will see the options shown below.
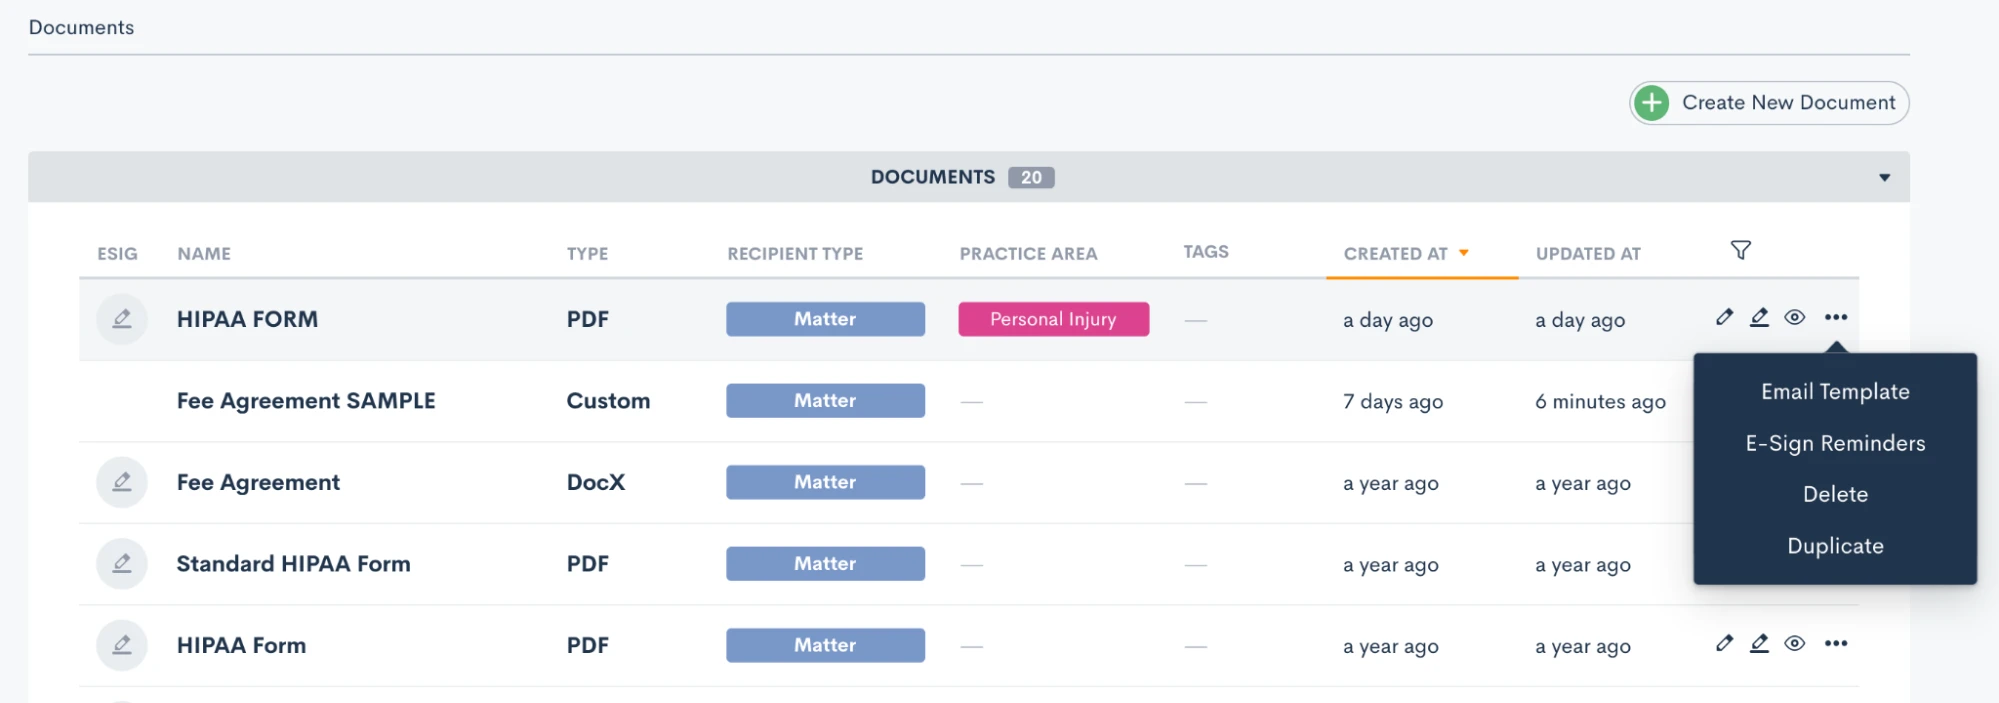
The email template gives you the ability to create your custom email that can be easily accessed any time this particular document is sent. E-sign reminders allow you to create custom built-in reminders for signature at any timing of your choice. Both of these options are great ways to not only add customization, but also to keep your templates highly functional. Both of the options above can be utilized when the document is sent manually or via automation. Now let’s take a look at sending documents automatically.
Navigate to the Automations page found under the Marketing tab. When adding action items to an Automation you’ll see the options for both Send Document as well as Request Signature:
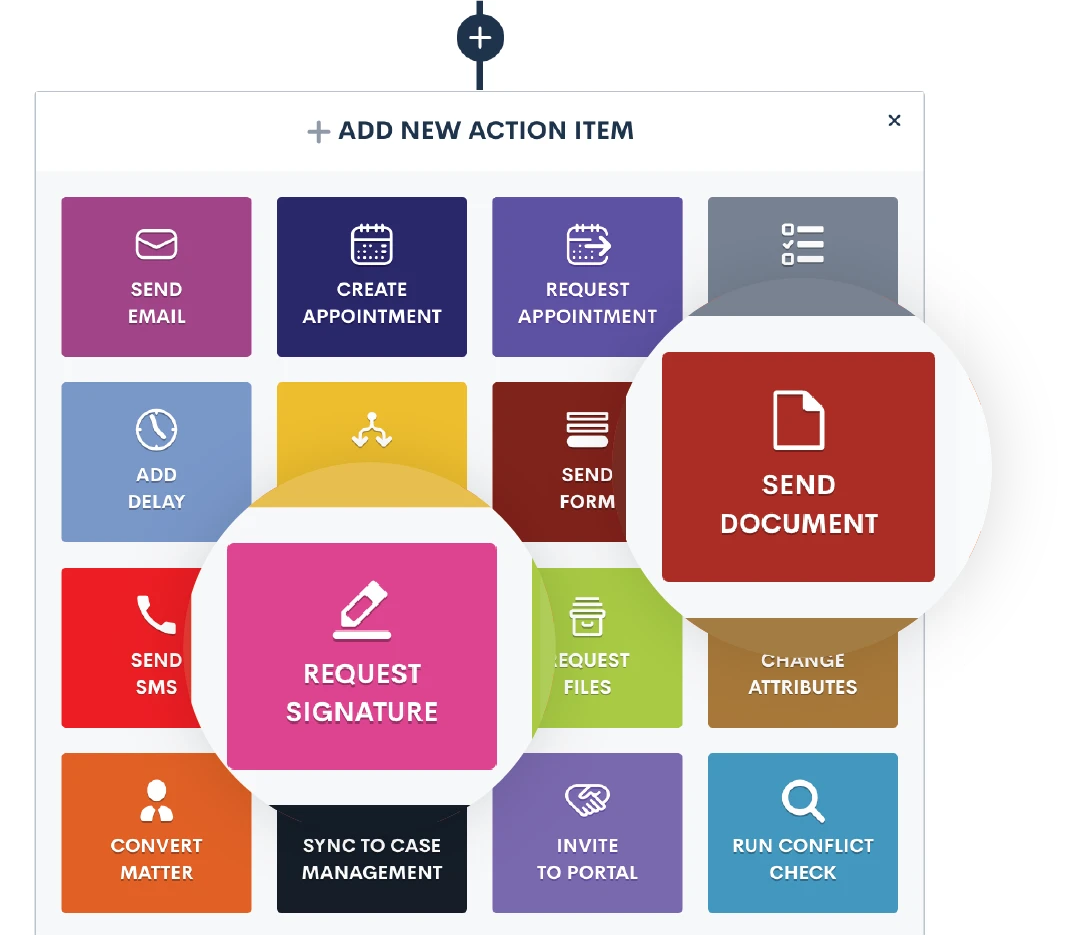
When you use the Send Document action, this will email the document (with fields merged in appropriately) as an email attachment. It does not include e-signature.
Any time you want to send a document out for e-signature you will use the Request Signature action item. Once you select Request Signature in your automation you will then make selections for all the options shown below:
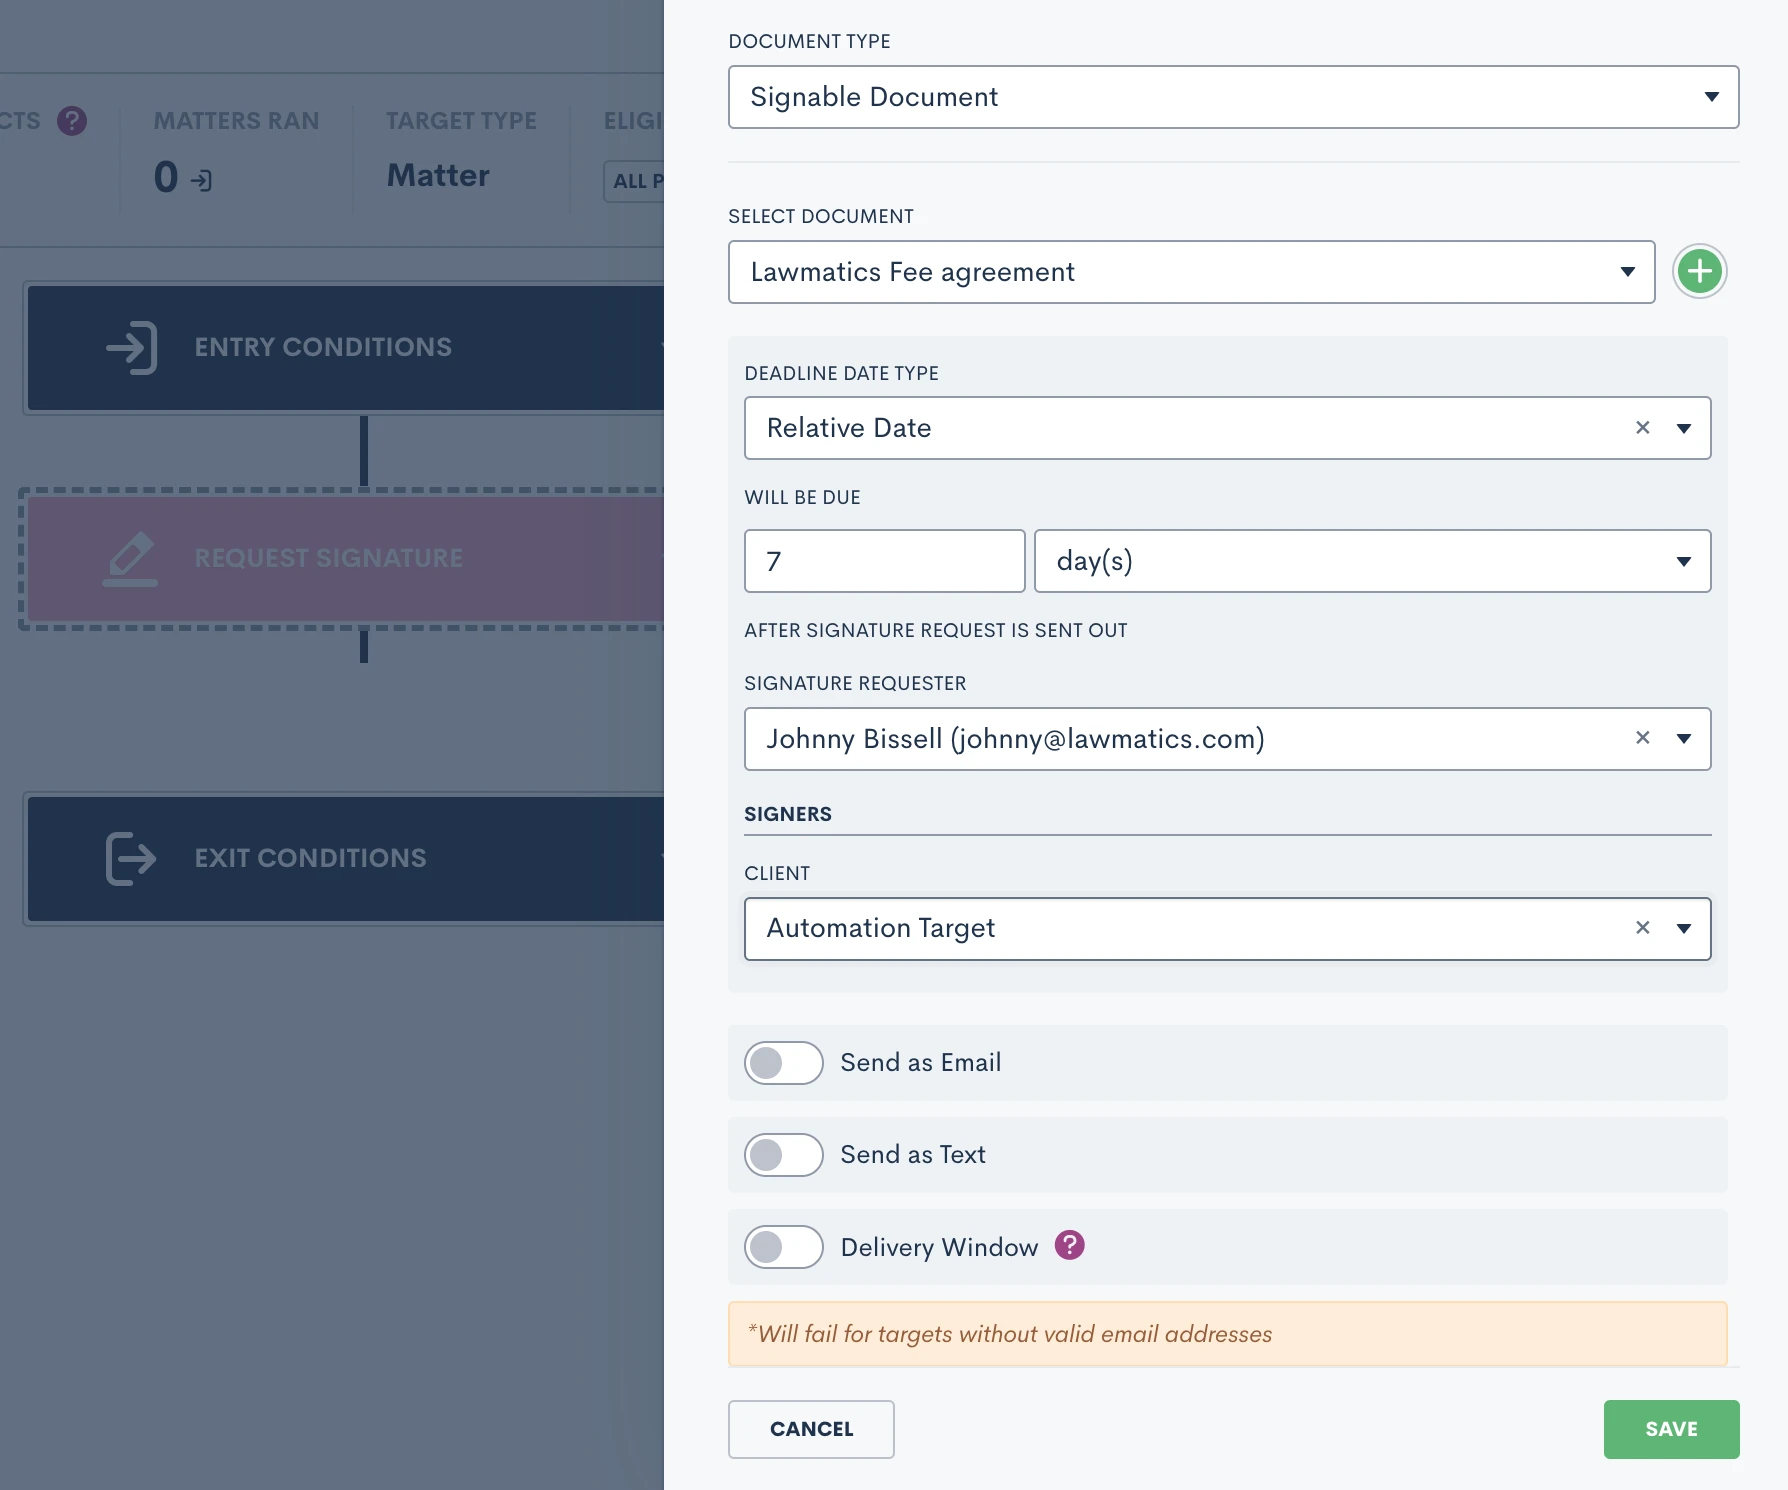
Select a due date if you would like, knowing that the signature request will automatically expire if it is not signed before the due date. You’ll also have options to send this document as an email, text message or both. When sending as an email you’ll have the opportunity to select your custom template for this document.
You’ll also notice the option for Delivery Window shown above. We strongly recommend using this feature to make sure that important document are only sent during the hours of your choosing, in case you’re working on cases after hours.
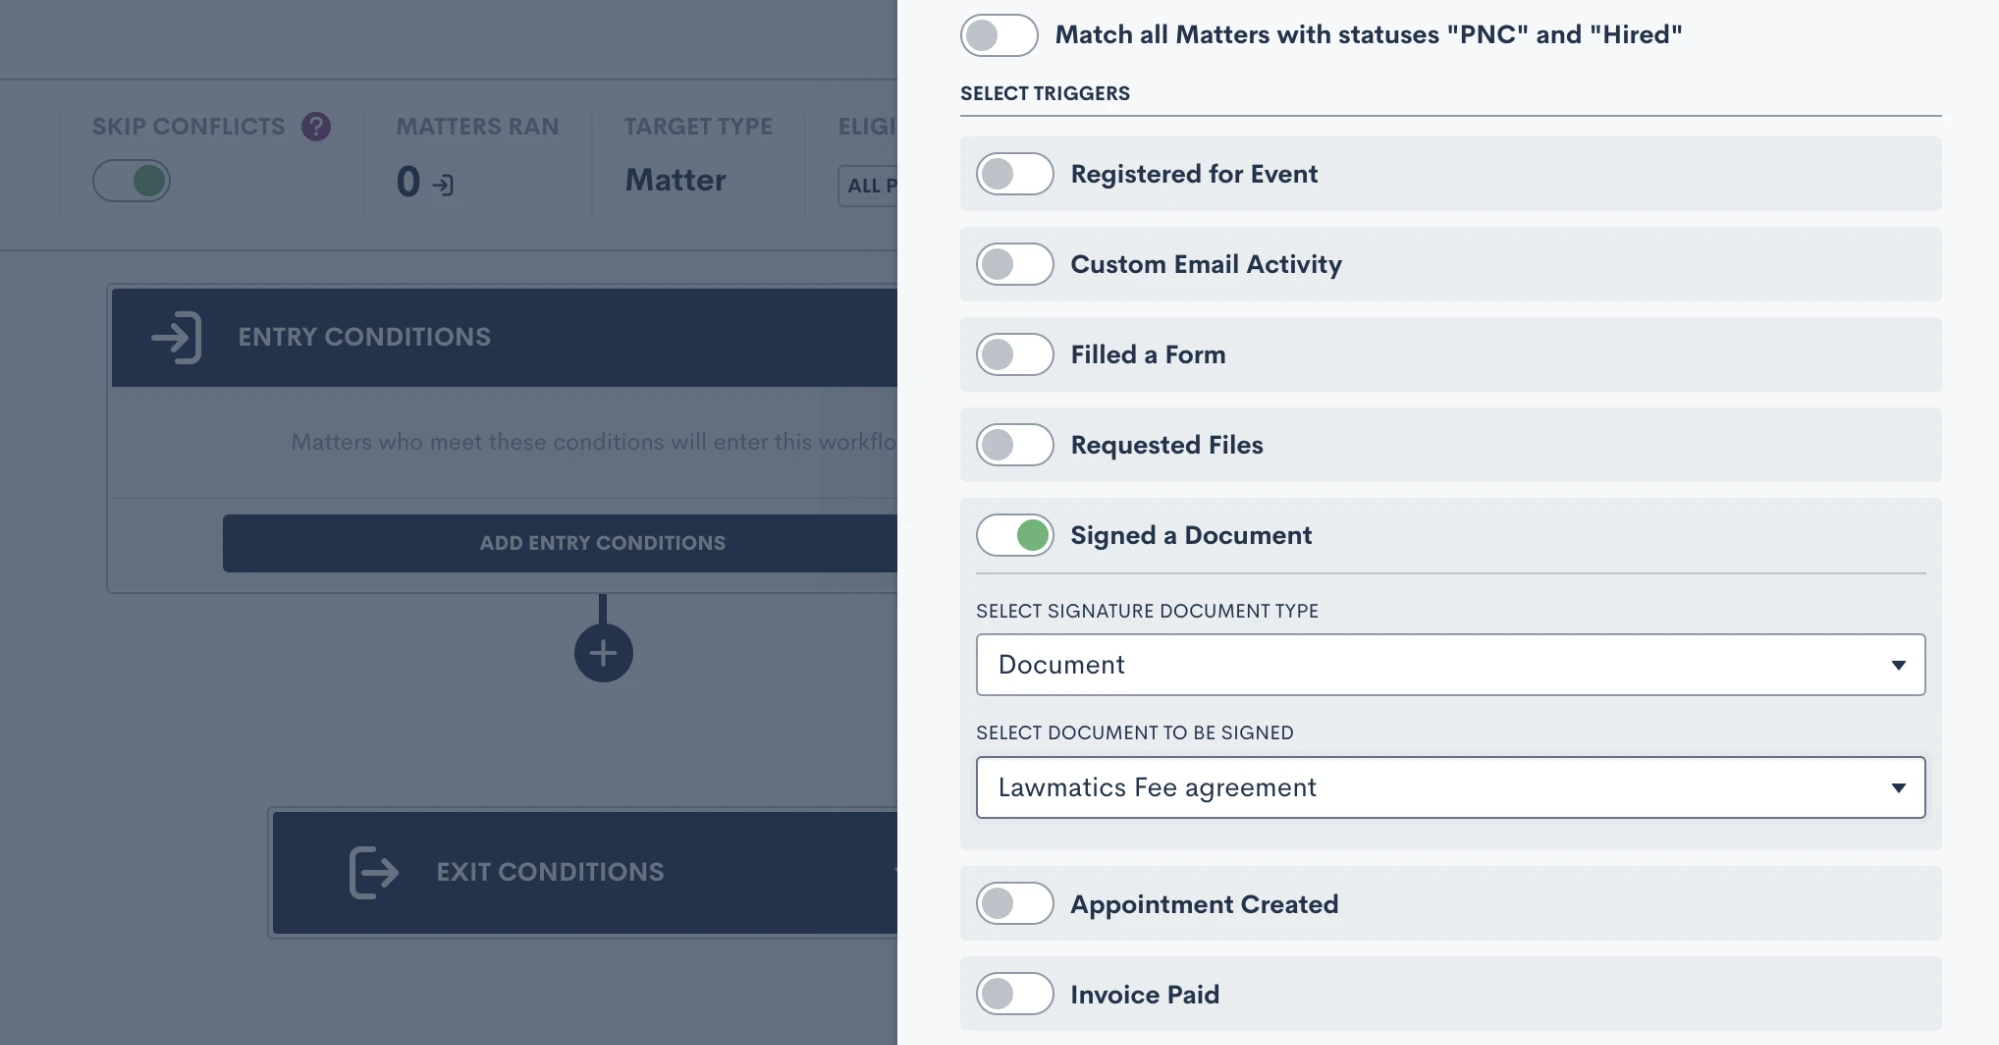
In addition to sending documents via Automation, you can also trigger an Automation when a document is signed. Add this as an entry condition by clicking the Signed a Document option, and then select your specific document.
Managing e-signature requests
Once you have all of your document templates built out in Lawmatics, and have maybe even set up Automations to send them out for signature, you’ll want to be familiar with some of the ins and outs of managing your e-signature requests.
Begin by navigating to the Documents page, and scroll down to the section labeled Documents Sent for Signature. Here you will see a summary of all signature requests that have been sent, including the current status, the document name, the primary matter, a list of all document signers, and more.
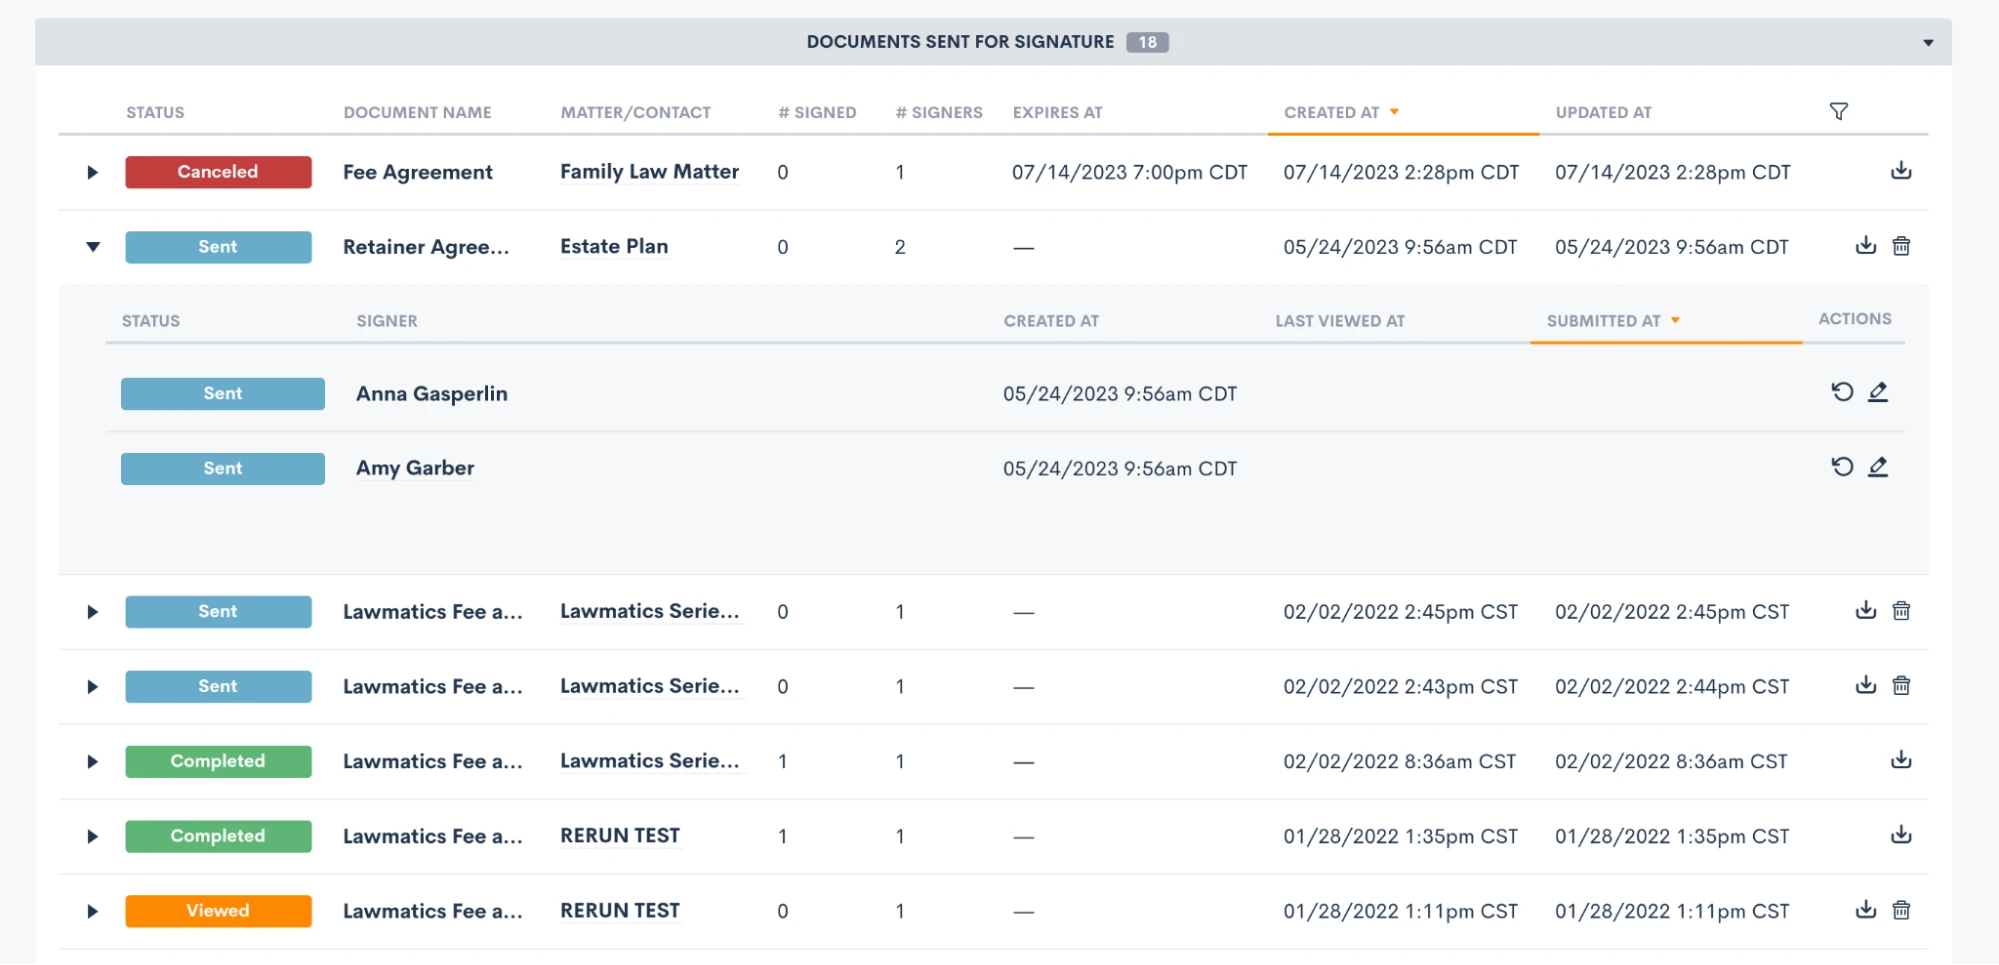
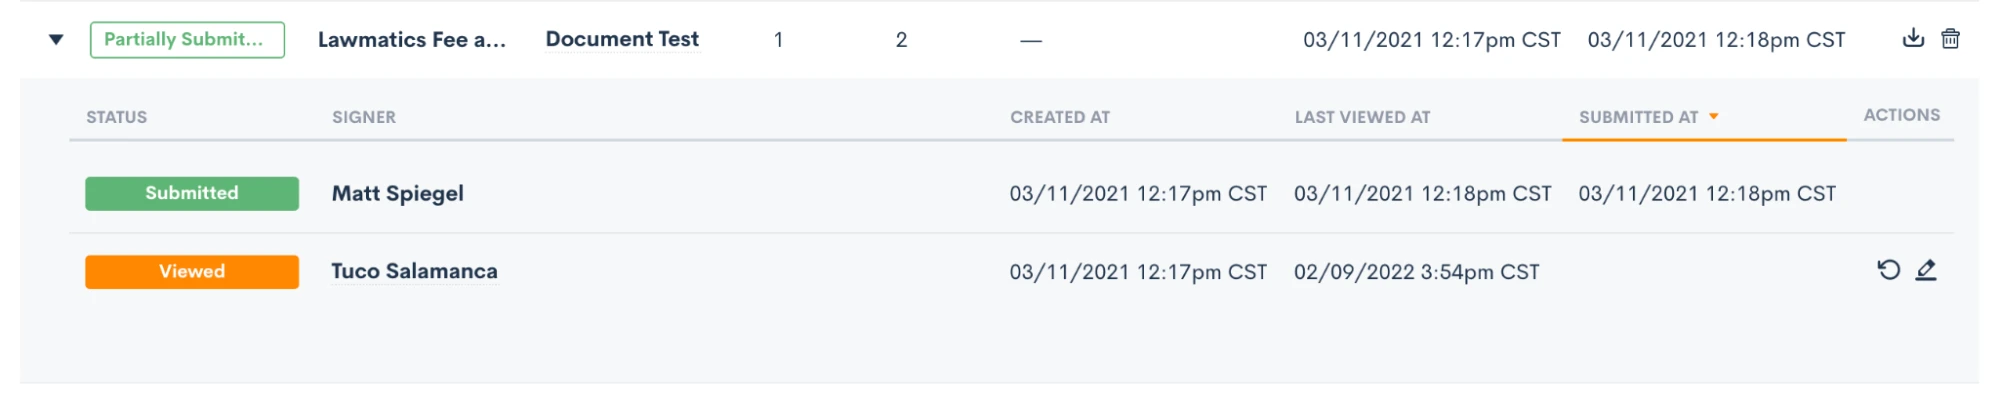
Expand a signature request, as shown above, to view the specific signer details. You can also manually resend a signature request to a specific signer when needed by clicking the circular arrow icon (shown above on the right) for the signer who needs it resent.
You’ll also notice that for any documents with an expiration date you will see that clearly stated on this page too. Signers can no longer access and sign a document after its expiration date has passed, but you can manually reactivate and resend it here on this page if needed.
Remember that if a document has multiple signers, the status for each signer may be different.
Here in this section you can also download and view a document or cancel one as needed.
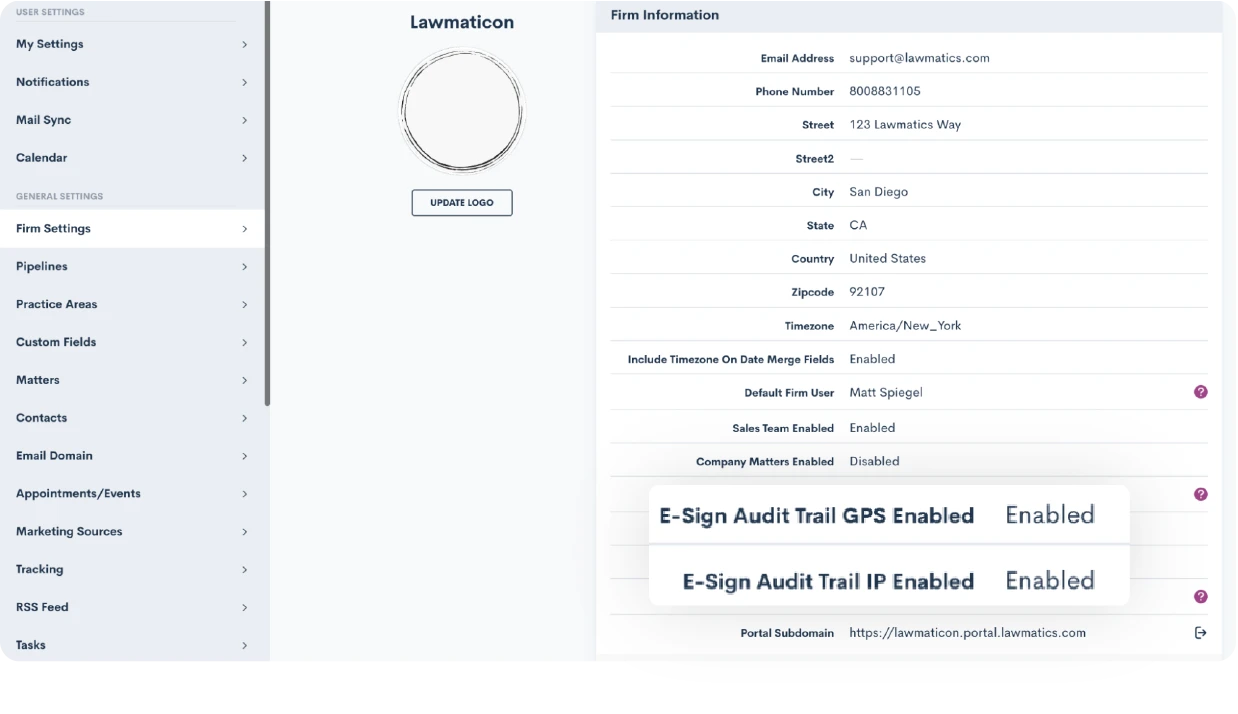
Any time you send out a signature request, whether manually or via Automation, you’ll be prompted to select one of your users as the signature requester. This person will automatically be copied on an audit trail of the document, receiving email notifications when signature requests are viewed and signed by each signer.
To help ensure security and accuracy, you have the option to include the signer’s GPS location as well as IP address on this audit trail. These two options can be enabled or disabled as desired in your Firm Settings page.
Conclusion
Harnessing the power of document templates and e-signature solutions can truly revolutionize the way your law firm handles paperwork and interactions with clients. By streamlining document creation, improving accuracy, and enhancing security, Lawmatics helps empower you to focus more on delivering exceptional legal services.
Our Document Templates allow you to create documents automatically. Instead of starting from scratch each time, simply use your pre-built template that tailors itself to each matter’s specific legal needs. E-signatures offer unparalleled convenience, speed, and compliance, making the signing process seamless for clients and attorneys alike.
Embracing these technologies not only boosts efficiency but also showcases a commitment to innovation and client-centricity. As the legal landscape continues to evolve, adopting document templates and e-signature solutions is undoubtedly a forward-thinking step towards becoming a smart firm. So, embrace the future of legal document management and elevate your firm to new heights with these indispensable tools.